Skip to content






tl;dr On How To Connect Custom Claude Connectors
A custom connector is a configuration that allows you to connect Claude to an external tool that you use. You can also add tools such as tl;dv, using the directory feature of reviewed tools from Anthropic with just a few clicks.
To add a custom connector, go to:
- Settings
- Connectors
- Add custom connector
- Then paste the URL (typically ends with /mcp, but can differ)
- Set up OAuth or an API key
- Enable it within your chat
- Test it with a simple read request
One important thing to note when setting up a custom connector is that it must be publicly reachable over HTTPS, as Claude uses Anthropic’s cloud and not your machine.
Free plans on Claude allow for one custom connector. Paid accounts allow for several to be connected, at no extra cost other than what you would pay for the external tool.
How to add a custom connector in Claude? Claude in 2026 is an incredibly powerful tool on its own; it can do so many things. But it can be restricted by how much information it has access to, and how skilled you are at prompting.
Adding a custom connector lets you plug in tools you already use, such as tl;dv. Some tools add automatically from Claude’s ready-made directory. Others need a few manual steps, which is where people can get a bit stuck.
What A Custom Connector Actually Is
A custom connector links an app, tool, or source data using the web address of a remote Model Context Protocol (MCP) server.
By making that connection, Claude can read and use the capabilities of that service, bringing that information and power into your Claude ecosystem, whether from the LLM interface, Claude Cowork, Claude Code, or even Claude Design.
An MCP server is Anthropic’s open standard for connecting AI to outside tools and data. The connector is the way that Claude “speaks” with it.
Directory Connectors Vs Custom Connectors
There are two different types of connectors in Claude.
- Directory Connectors
- Custom Connectors
Directory connectors are the ones Anthropic has reviewed and offers natively in the interface, like the examples below. These can be connected with a simple button click and are ready to go, with maybe a couple of steps for logging in.
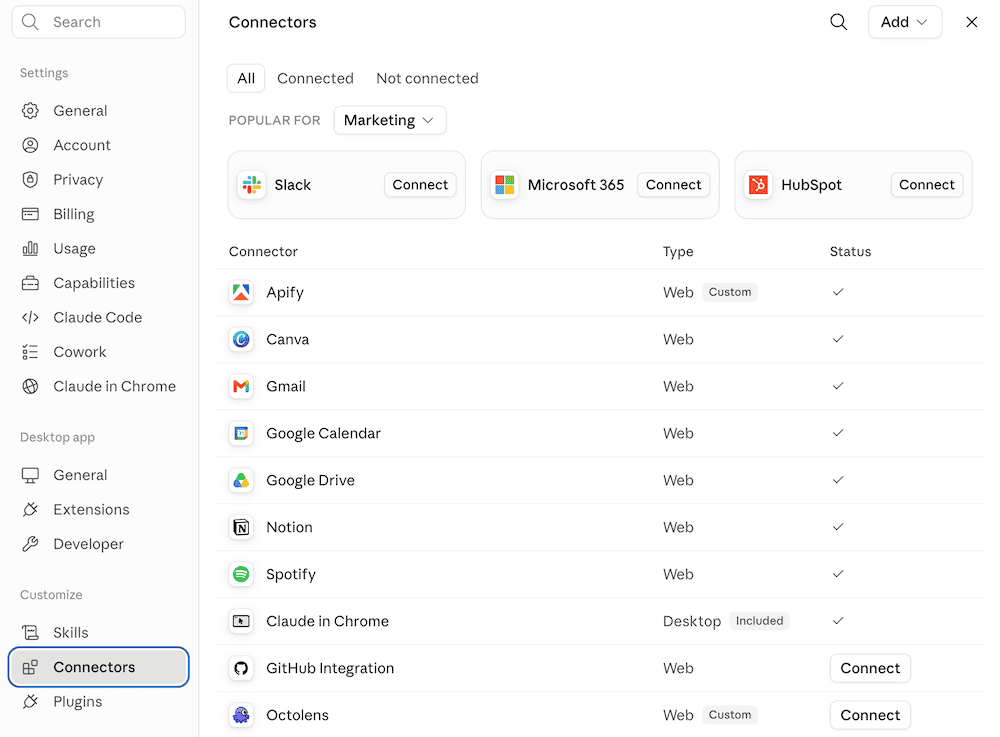
Custom connectors require a little more work.
They need to be implemented by the user. While “under the hood” they are the same as directory connectors, as they both run on MCP, the key difference is that they are not vetted by Anthropic and they need to be manually set up.
What Is A Plugin?
One thing to be aware of is the difference between a plugin, connector and skill:
- Connector is something that connects Claude to an outside service.
- Plugin is a bundle that you can install that includes connectors, skills, and tools.
- Skills are a set of instructions for doing a task over and over again.
What To Have Ready Before You Start Connecting A Custom Connector
There are four key things to get in place before you connect a custom connector to Claude. None of it requires coding.
A Publicly Reachable MCP Server URL
In order to connect Claude to your custom connector, the server that it’s on needs to be open to the public internet using HTTPS. This means that if it’s on a private network, has a VPN or a firewall, it won’t be accessible. You can add Anthropic’s IP ranges to unlock in some circumstances.
The Right Plan
The plan level you have from Anthropic dictates how many connectors you can set up.
Free allows one custom connector.
If you are on a higher paid plan such as Pro, Max, Team, or Enterprise, you can add several. Setup can be done either through the web app or the Desktop app.
One thing to note is that Team and Enterprise require the connector to be ringfenced within certain projects.
Owner Access on Team or Enterprise
On a Team or Enterprise plan, only an Owner or Primary Owner can add a connector to the organization.
Regular members can’t add one themselves, but they can connect to any connector an Owner has already set up.
So if you need a new connector added, you’ll need to request it from someone with Owner access.
Your Authentication Details
In order to connect, you’ll need to be able to prove who you are, and how this is done depends on the server. One of the most common ways is using OAuth, which is simply logging in and approving access.
Find And Check Your Connector URL
To find the URL to connect your outside tool to Claude, look for the connector URL in the tool’s documentation or connector page. This may be tucked away, but this is the MCP endpoint, the address Claude actually talks to, and it will normally have something such as /mcp at the end. So, for example, https://app.tool.com/mcp, rather than the homepage. This is just an example, and the exact path will likely be different.
The company help center or documentation will likely hold this and will also typically have a setup flow to follow, including whether it requires OAuth or an API key.
One thing you can check is to open the endpoint link in your browser with your regular internet connection, without any VPN. It won’t be a pretty page, but it should respond rather than time out, which tells you it’s live. Make sure you’re clicking a link from a trusted service.
Adding A Connector On Pro Or Max
If you have a personal level plan such as Pro or Max, adding a custom connector is incredibly simple. When you have your URL, these are the five steps.
- Open Settings and go to Customize, then Connectors.
- Click the “Add” drop-down in the top right of the pop-up.
- Choose “Add custom connector” at the bottom of the list.
- Paste your MCP server URL into the field (the endpoint ending in /mcp from the last section), and name the connector something that makes it clear what it is.
- If the server uses OAuth, open Advanced settings and add your client ID and secret, then click Add to finish.
After this, Claude should open a sign-in window. You then approve the permissions it requires, and the connector should be live and available in your chats right away.
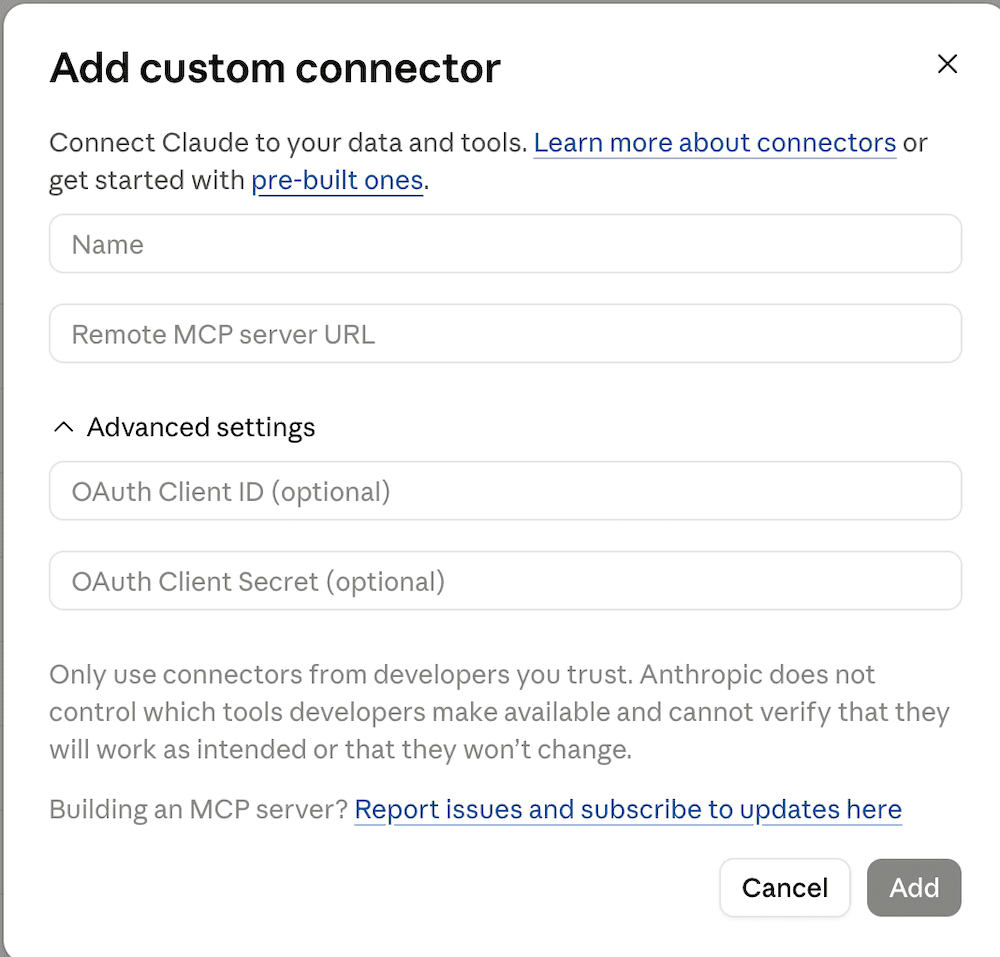
There is also the opportunity to add a connector directly in a chat by pressing the plus sign near the prompt box and following the menu tabs to find “Add Custom Connector”. This is also where you can toggle your connectors on and off.
If the sign-in window doesn’t appear, that’s usually a URL or auth issue, and the troubleshooting section covers it.
Adding A Connector on Team or Enterprise
Connecting a custom connector to your Team or Enterprise account is a little bit different, requires two stages, and depends on your level of access.
An Owner or Primary Owner must add the connector for the whole organization. Following that, each member of the team then connects their own Claude account to it before they are able to use it.
Owner Steps
- Open Organization settings and go to Connectors.
- Click Add.
- Hover over Custom, then select Web.
- Paste the remote MCP server URL.
- To add authentication, open Advanced settings and enter the OAuth Client ID and Client Secret.
- Click Add. The connector is now available for everyone in the organization to connect to.
Member Steps
As mentioned earlier, members of organizations are not able to add new connectors themselves. These must be set up by the Owner or Primary Owner of the workspace. If a connector has been created, members can then connect to it.
- Open Customize, go to Connectors, and find the one your Owner added.
- Click Connect next to it.
- Sign in to the tool, approve the permissions it asks for, and it’s live in your chats.
Choosing How Claude Authenticates
There are three options for how Claude authenticates a custom connector.
OAuth is the standard method. You click Connect, Claude sends you to the tool’s consent screen, and once you approve, the tool passes back a token rather than your password. Claude stores that token, and you can revoke it any time without changing your login. When the server requires it, your Client ID and Secret go under Advanced settings during setup. Tokens refresh in the background, so you rarely need to reauthenticate. One catch: the redirect or callback URI (where the tool sends you after login) has to match exactly. A single wrong character and the sign-in fails.
Request headers cover servers that use a fixed credential like an API key or bearer token. You paste the key into the header field and Claude stores it securely. This is common with self-hosted servers and is currently in beta, so expect the odd glitch.
No authentication is possible too, but treat it cautiously. A live connector holding real data should never be left open.
Turn It On And Check It Works
To use your connector, first switch it on. This can be done in any chat by clicking the + button on the lower left of the prompting box. Open Connectors and toggle on the ones you want for that chat.
Confirm It Connected
Once switched on, the connector can show the various tools it now has access to. If the tools are listed, this confirms that Claude is talking to the server. If nothing appears, or the toggle won’t hold, it didn’t connect.
Your First Test Prompt
To test it, do a simple prompt by asking Claude for something you know the tool has access to. For example, if you are connected to tl;dv via the MCP, you can ask “What are some of my most recent tl;dv meetings?” If it comes back with what you need, it’s working. If not, it may not be switched on, or need troubleshooting
The very first time you use a tool with the connector, you will get a prompt from Claude in the chat box asking for your permission to run it. You can approve it as a single action, or opt for “Allow always,” which will keep it connected. Anthropic suggests only selecting Allow always for tools that you trust to run without being watched, so things like reading data rather than pushing things out or changing the data.
Tool-Loading Modes And Context Cost
There are three modes that Claude can load a connector in, and the most selected can dictate how much space a conversation has left.
- Auto gives Claude the chance to choose which tools to load based on your prompts.
- Always available is the mode that keeps every tool from that specific connector available for that entire chat.
- On demand only loads the tools and connectors when specifically directed to.
Each tool can take up context, which is the working memory of the conversation. When you start layering different connectors, with several tools attached to each, it can become quite heavy and use up a lot of tokens. That context comes out of your plan’s allowance too, so heavy connector use is one of the quickest ways to hit your Claude usage limit.
This is when to use On demand. If you are using several connectors, but intermittently, then you can only choose to bring them into the workspace when required, rather than with every prompt.
You can also switch off individual tools you won’t use, so Claude stops loading them.
Connecting Your Meeting Records From tl;dv
tl;dv is a powerful suite of tools and an AI meeting assistant. It records meetings, creates transcripts and summaries, and captures all the things that happen in meetings.
tl;dv has a native MCP server that connects directly to Claude, so every Google Meet, Zoom, Teams, or meeting captured using the desktop app can be pulled directly into Claude.
The Directory Route
tl;dv is available as a connector in the trusted directory from Anthropic. Simply click the button, sign in once, and you are able to get read-only access to your recordings.
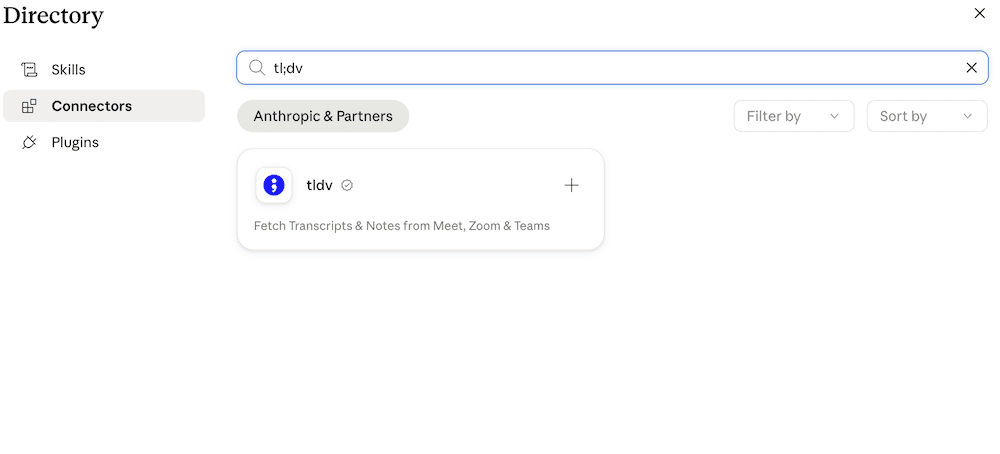
Once it’s live, you can ask things like:
- Summarize the transcript from yesterday’s client call
- Pull the action items from this week’s team meetings
- Find every meeting where we discussed pricing
- Catch me up on the calls I missed while I was away
- Draft a follow-up email based on my last sales call
And because tl;dv is already a reviewed and approved directory connector, you don’t need to go through the custom-connector setup mentioned above. The custom connector flow is most useful when a tool doesn’t appear in the directory but offers MCP; by following the steps outlined above, you can get it connected.
Editing and Removing a Connector
There’s no edit function. To change the URL or auth details, remove the connector and re-add it.
To remove one, open Settings, then Connectors, click the connector, and choose Remove.
On Team and Enterprise, an owner does this from Organization settings to pull it for everyone.
Removing a connector revokes Claude’s access to that tool straight away.
When A Connector Won’t Connect: Troubleshooting
Most connector failures come down to reachability or auth. When one hits, note the ofid_ reference ID Claude shows in the error; support will ask for it.
Couldn’t reach the MCP server. The most common cause. Your endpoint isn’t publicly reachable. Open it from a network off your VPN and confirm it responds over HTTPS.
Firewall, WAF, or CDN blocking. If your edge logs show 403 or 429 responses to Anthropic, a firewall or CDN is filtering the traffic. Allowlist Anthropic’s outbound IP ranges.
Redirects breaking auth. A 301, 302, 307, or 308 redirect drops the Authorization header along the way. Register the final URL in Claude, not one that redirects.
A 404 or 500 from the server. A 404 usually means the URL path is wrong; often the /mcp endpoint is missing or mistyped. A 500 is the server erroring on its side, so check its own logs rather than anything in Claude.
Authorization failed, or a 401. OAuth runs through three discovery stages, and a break in any one shows up as a 401. Two usual culprits: your Application ID URI has to match exactly, with no trailing slash, and your redirect URI has to match what Claude uses, character for character.
Connected, but no tools appear. The connection held, but the server exposed nothing usable. Check the server is actually serving its tool list. If tools show but Claude won’t use one, make sure it’s toggled on for that conversation, and you approved the tool when asked.
Auth dropped after a restart. Sometimes a server restart invalidates the token. Remove and reconnect the connector to re-authenticate.
Still stuck? Gather three things before you file with support: the ofid_ reference ID, the exact server URL you entered, and your server logs from the moment it failed. With those, support can trace the request end to end instead of guessing.
Security, Permissions And Your Data
Custom connectors are safe to use. The one thing to keep in mind is that Anthropic reviews directory connectors like tl;dv, but not custom ones you add yourself. A custom server is one you’re vouching for, so connect only to servers you trust and control.
You stay in control at the point of connecting. Read the permission request before you approve it, grant the narrowest scopes the job needs, and prefer read-only access wherever it’s offered. If the tool lets you set tools individually, Claude’s Always allow, Needs approval, and Blocked settings let you approve reads and block anything that can delete or overwrite your data.
It’s also worth knowing about prompt injection, where data a connector returns carries hidden instructions aimed at Claude. Anthropic builds in defenses against this, and your own judgment is the other half: take extra care with servers that handle untrusted or public content.
What Happens to Your Data
A connector can only reach what your own account can reach; it inherits your permissions, not more. What Anthropic does with the data that passes through, including whether it’s used for training and how long it’s retained, depends on your plan and settings, so check Anthropic’s privacy documentation and your data controls rather than assuming. Take extra care with Research, which can invoke tools on its own, so a connector may be called without you prompting it directly each time.
And your off switch stays simple. Revoke access in Claude by removing the connector, or cut it at the source service by rotating the key or pulling the app’s authorization.
Getting More From A Connected Claude
That’s the setup from finding the right server URL to connecting and testing your connection using a prompt. Once you’ve connected one tool, the process follows the same steps and opens up a wide range of possibilities for how to use Claude to manage your data.
To get started, try it with one tool that you use every day. And if you’re not sure where to begin, try first with tl;dv, using the directory to connect it rather than the custom connector setting. By connecting your tl;dv library, start by asking Claude for action items from your last call and start to see the possibilities that can come from that.
FAQs On How To Add A Custom Claude Connector in 2026
Do I need a paid plan on Claude to add a custom connector?
No. The Free plan supports one custom connector. Pro, Max, Team, and Enterprise let you add several, with no cap.
How do I add a custom connector on a Mac?
Open Settings, go to Customize, then Connectors, and choose Add custom connector. The steps are the same on Mac and Windows, since the setup lives in your Claude account, not on the machine.
What's the difference between a custom and a directory connector?
A directory connector is pre-reviewed by Anthropic and added in one click. A custom connector is any remote MCP server you add by its URL. Both run on the same MCP infrastructure.
Can I add a custom connector without authentication?
Yes, but only use no-auth connectors for development and testing. Any connector holding real data should use OAuth or an API key.
Why does my MCP server work on my machine but not in Claude?
Claude connects from Anthropic’s cloud, not your computer, so a server on localhost or behind a VPN isn’t reachable. It needs a public HTTPS URL.
How do I edit a custom connector?
There’s no edit button. To change a URL or credential, remove the connector and add it again with the new details.
Does adding a custom connector cost extra?
No. Connectors are included with your existing Claude plan. You only pay for whatever the connected tool charges on its own side.