Recordings & Transcriptions

Capture all the value in your meetings: High-quality recording, clear transcripts, and useful clipping tools, regardless of the platform used or language spoken.

Make every recorded second count

High-quality video and audio recording. tl;dv can process unlimited meetings in parallel – no need to clone yourself after all 😉

Don’t miss a beat from any meeting

tl;dv uses best-in-class transcription engines, delivering high-rate transcription accuracy.

Break down language barriers

Work and talk in multiple languages, including 🇧🇷, 🇲🇽, 🇯🇵, and +30 others.

See all languages.

Social media comment on cat language

We're beyond transcription

Transcription is just the start. Let AI uncover and highlight the insights that matter from your meetings.

Key features

Capture every meeting, on every platform

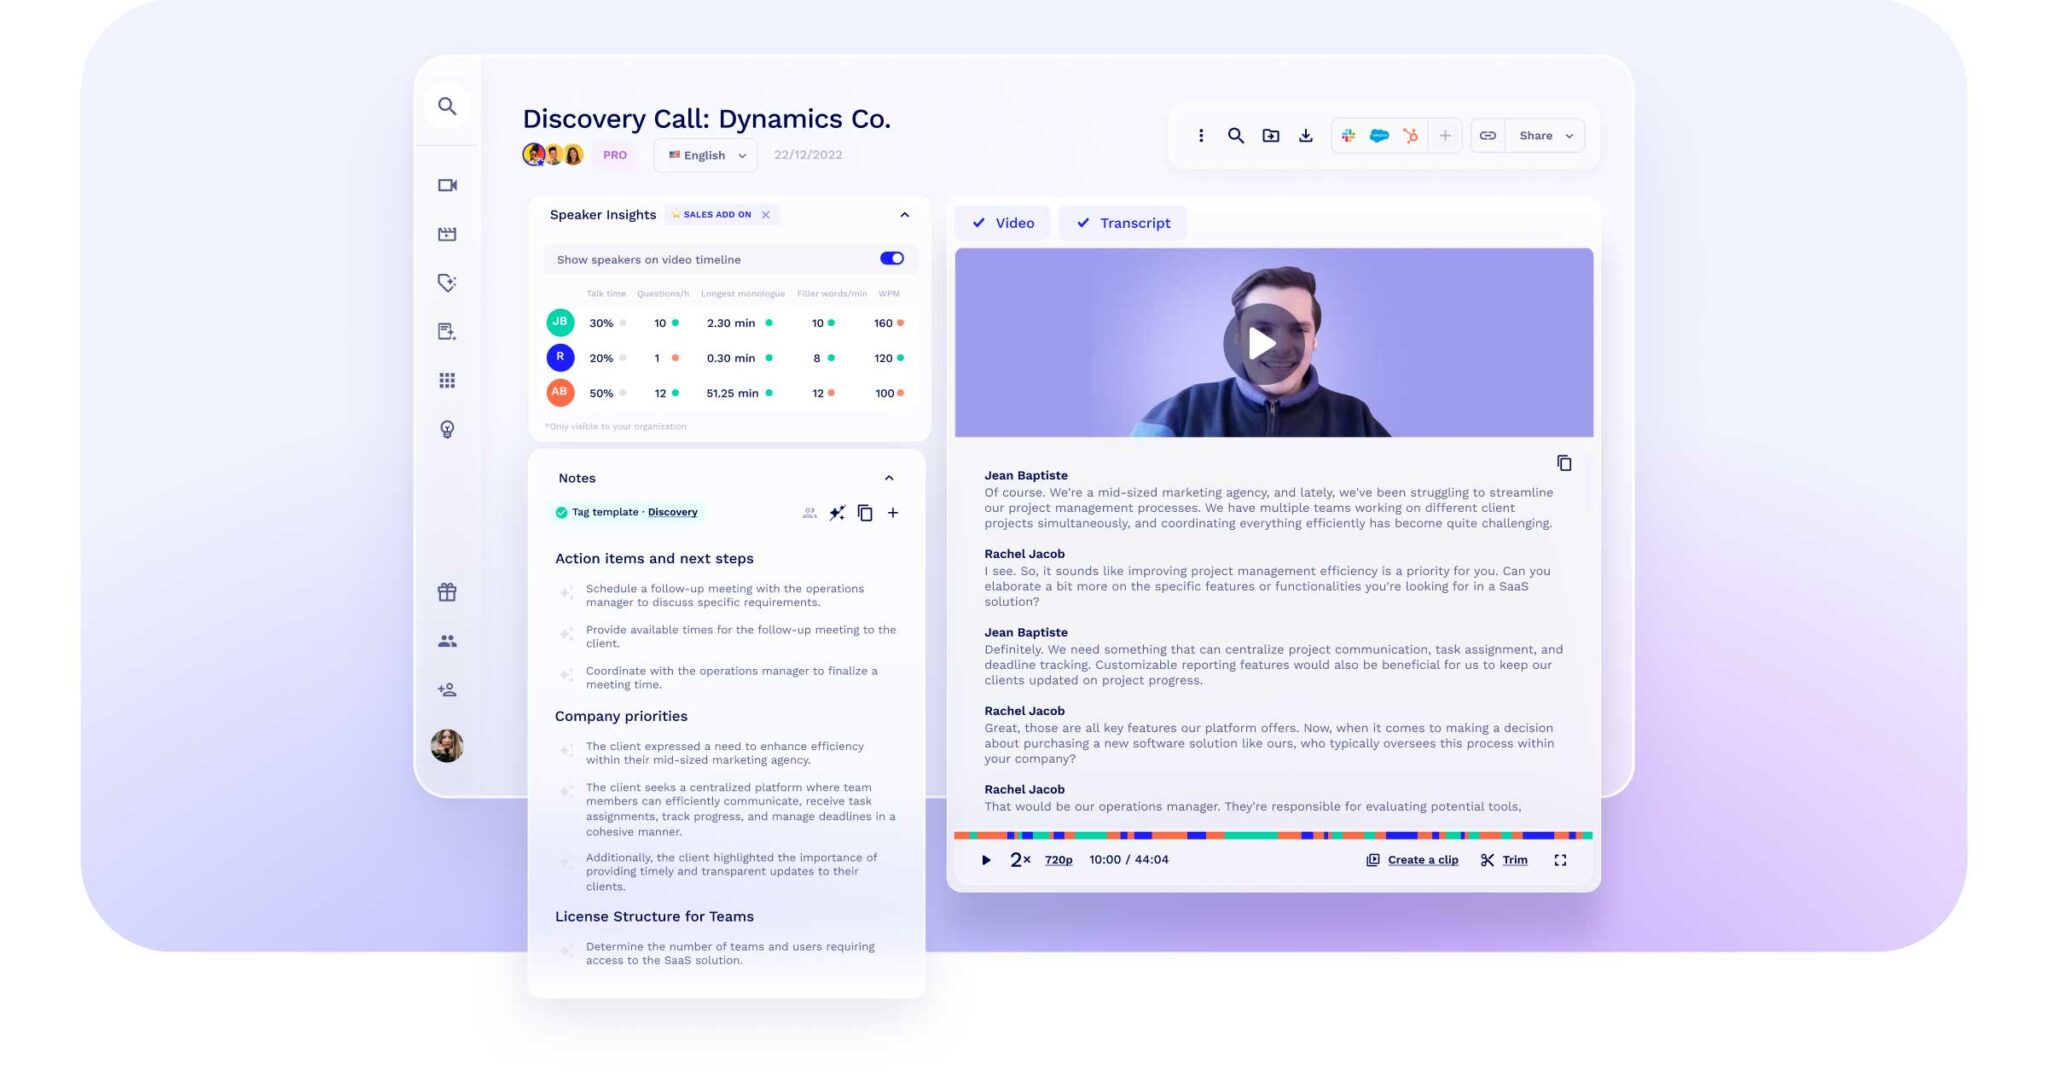
tl;dv records, transcribes, and summarizes meetings on Zoom, Google Meet, and Microsoft Teams, while also capturing slides and generating a summary.

Recognise who's who in every meeting

tl;dv adapts to your conversation’s speed and your team’s diversity, providing automatic, highly accurate transcripts that recognize each speaker and accurately tag participants’ names.

Highlight and Clip

The best way to share specific call moments with stakeholders, users, clients, and colleagues. Create snippets from recordings by highlighting the part of the transcript you want transformed into a clip!

Stitch them together with Reels

Stitch together the highlights and share a compelling narrative that grabs stakeholders’ attention without demanding their time to sit through the entire meeting.

loom logo
"tl;dv is a Customer Superbrain that helps me remember every detail from any customer conversation, and elevate the emotional insights throughout my entire organization"

Susana de Sousa
CS Director, Loom

Track your fave Topics

Create custom topic trackers, and get notified about discussions around virtually anything; objections, pricing, competitors, etc.

Fine-tune meeting recordings (soon)

Tailor your content by trimming the edges of your meetings to focus on what truly matters, ensuring your recordings are nothing short of perfection.

Find any meeting moment in a jiffy

Search by keyword through transcripts, titles, and participants for quick, precise access to the moments that really matter.

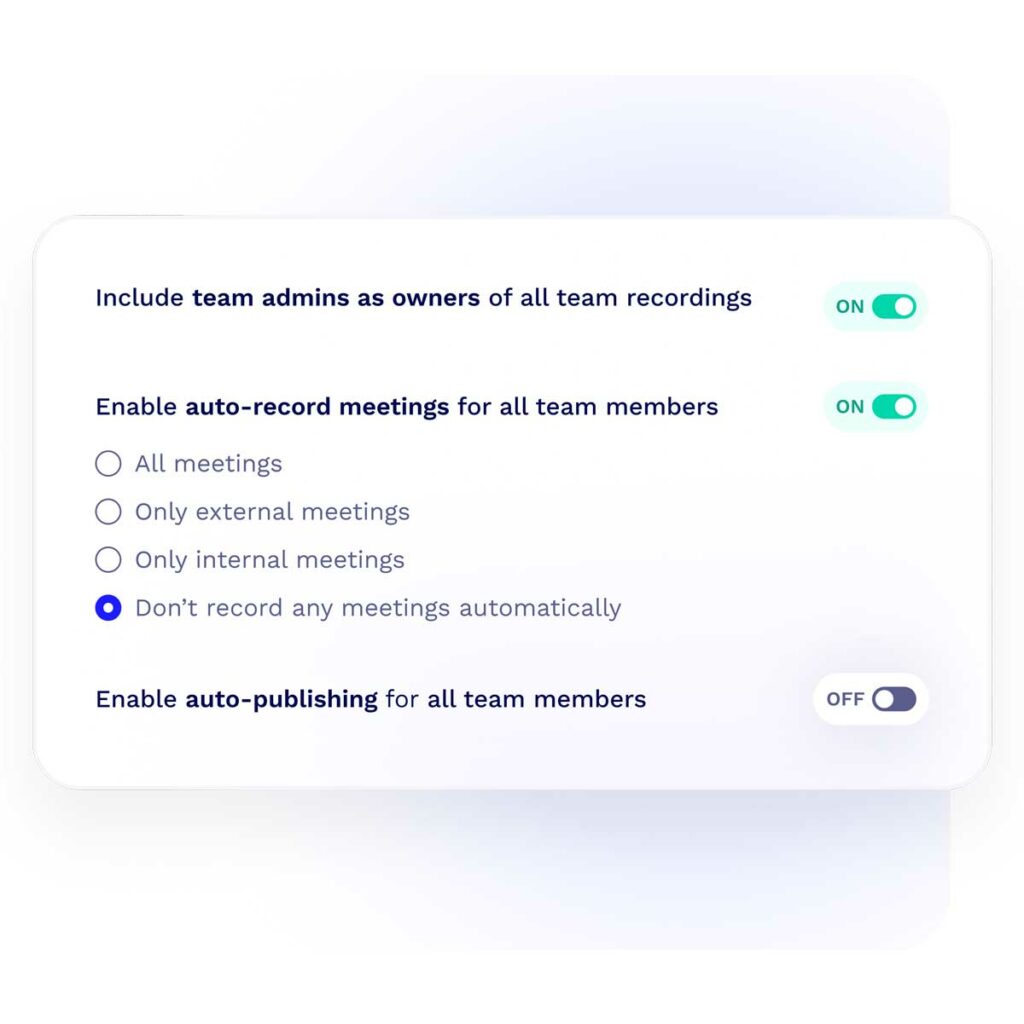
Automatically record every meeting

For yourself, or your team – this is the best way to record every external, internal, or all meetings. Just set and forget.

"Skip the meetings: Maybe you don’t need the entire team on your next videoconference, after all..."​

Your questions, explained

Recording a Zoom meeting is a handy feature, whether you’re using Zoom for work, education, or personal reasons. Here’s how you can do it, depending on your Zoom account type and permissions:

If You’re the Host:
  1. Start the Meeting: Open Zoom and start your meeting as the host.
  2. Record the Meeting:
    • For a desktop client: Click the “Record” button on the toolbar at the bottom of the meeting window. You’ll have the option to record on this computer or to the cloud (the latter option is available if you have a paid Zoom account).
    • For a mobile app: Tap the three dots that say “More” in the bottom right corner, then tap “Record to the Cloud” (for paid accounts). Note that recording directly to your device is not available in the mobile app.
  3. Stop or Pause Recording: You can pause or stop the recording at any time by clicking the “Pause/Stop Recording” button on the toolbar.
  4. Leveraging AI: Unfortunately the journey with Zoom stops here. You’ll have to choose a tool like tl;dv to be able to take full advantage of your recording. tl;dv not only replaces the above manual process to record your Zoom meeting, but also transcribes and creates AI notes from your Zoom meetings according to your preference.
If You’re a Participant:
  • With Permission: The host needs to grant participants permission to record. If you’ve been granted permission, you can click the “Record” button on the toolbar at the bottom (desktop) or tap “Record to the Cloud” under “More” (mobile). If recording to the computer, the file will be saved locally.
  • Without Permission: You cannot legally record a Zoom meeting without the host’s permission. If you need to record, ask the host to grant you recording rights or to record the meeting themselves.
  • Regardless of being or not the host, when you use tl;dv you can record any meeting that you’re invited to. You don’t need to be present, your AI notetaker can just go in your place. To ensure GDPR, tl;dv can send a consent request automatically to each participant asking for their consent for the recording.
Accessing Your Recording:
  • Local Recording: If you recorded the meeting locally, Zoom saves the recordings in a default folder on your computer. After the meeting ends, Zoom will convert the recording to a usable format and open the folder containing the recorded meeting.
  • Cloud Recording: If you recorded to the cloud, the recording would be available in the “Recordings” section of your Zoom account. You’ll also receive an email with a link to the recording once it’s processed.
Important Tips:
  • Ensure you have enough storage space on your device if you’re recording locally, especially for long meetings.
  • Be mindful of privacy laws and obtain consent from participants before recording, as required by law in many jurisdictions.
  • Cloud recording comes with additional features like transcription, which can be useful for accessibility and documentation.

Zoom offers extensive support articles and guides if you encounter any issues or need more detailed instructions.

Recording a Google Meet meeting is a straightforward process, but it’s important to note that this feature is available only with certain Google Workspace editions like Business Standard, Business Plus, Enterprise editions, Education Fundamentals, Education Plus, Teaching and Learning Upgrade, and Nonprofits. If you have one of these editions, here’s how you can record your meeting:

  1. Before You Begin: Ensure you’re the meeting organizer or in a role with permission to record. If you’re not sure, check with your organization’s admin.

  2. Start the Meeting: Join or start a Google Meet session as you normally would.

  3. Begin Recording: Once in the meeting, click on the three dots (more options) at the bottom right of the Meet window. From the menu that appears, select “Record meeting”. If you don’t see this option, recording might not be enabled for your account or you might not have the necessary permissions.

  4. Notify Participants: When you start recording, all participants will be notified that the recording has started, which is a good practice for privacy and consent.

  5. Stop Recording: You can stop the recording at any time by clicking the three dots again and selecting “Stop recording”. The recording will also stop automatically when the meeting ends.

  6. Accessing the Recording: After the meeting is over and the recording has stopped, it will be processed and saved to the meeting organizer’s Google Drive in a folder named “Meet Recordings”. An email with the recording link will also be sent to the meeting organizer and the person who started the recording. Additionally, if the meeting was scheduled in Google Calendar, the link to the recording would be added to the Calendar event.

  7. Leveraging AI: Unfortunately the journey with Google Meet stops here. You’ll have to choose a tool like tl;dv to be able to take full advantage of your recording. tl;dv not only replaces the above manual process  to record your Google Meet meeting, but also transcribes and creates AI notes from your Google Meet meetings according to your preference.

A few things to keep in mind:

  • Only people within the same organization as the meeting organizer can start or stop a recording.
  • Guests or people from other organizations can’t record meetings.
  • Recordings include the main conversation and any presentations, but not other windows or notifications.

If you’re using Google Meet with a personal Google Account (not associated with a Workspace edition), you won’t have the option to record meetings directly within Meet. In that case, you might need to use a third-party screen recording software such as tl;dv as an alternative solution.

Microsoft Teams has emerged as a pivotal tool in today’s digital workplace, sparking your interest in how to record a meeting on the platform. Known for its comprehensive capabilities in facilitating communication and collaboration, it serves as a vital hub for virtual meetings. This platform enables team members to converse, exchange files, and collaborate seamlessly, regardless of their physical location. Its ease of use and smooth integration with other Microsoft Office applications have made it a preferred choice for numerous organizations.

In this digital age, where remote work and online collaboration are increasingly becoming standard practices, the significance of Microsoft Teams has soared. Its compatibility with other Microsoft Office tools further amplifies its utility, solidifying its status as an essential asset for businesses big and small. Beyond its core functionalities of communication, the recording feature of Microsoft Teams plays a crucial role in fostering accountability and facilitating the sharing of knowledge in a virtual setting.

Recording meetings in Microsoft Teams is an invaluable function for a variety of needs, from documenting critical discussions to archiving training sessions, or simply preserving conversations. This guide is designed to navigate you through the process of recording your meetings on Microsoft Teams, a useful practice for revisiting salient points, sharing the session with absentees, or for archival purposes. Furthermore, we will introduce you to tl;dv, an alternative approach, and explore its advantages.

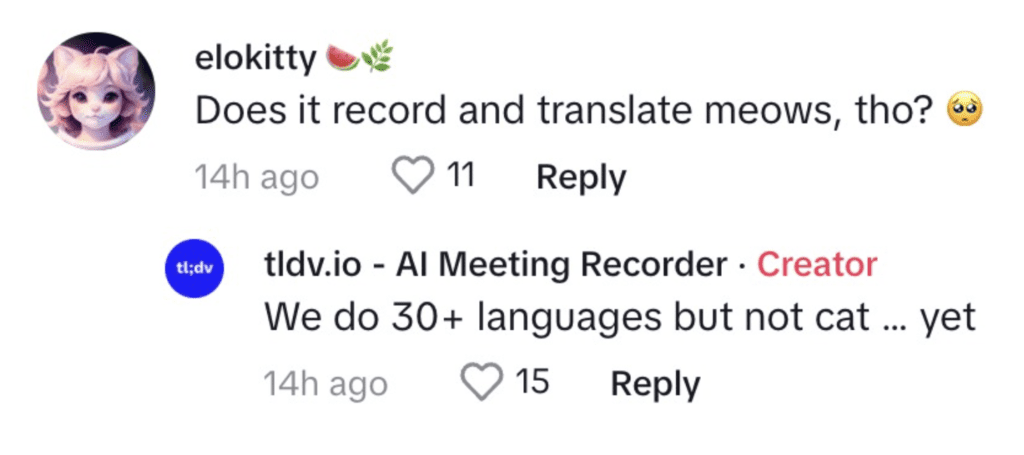
tl;dv is proud to support voice to text translations with an accuracy of 96%. Not seeing this reflected in your meeting recordings? Transcript quality is directly dependant on audio quality, so here are some easy things you can do to improve your overall transcript experience 🚀

  1. Keep yourself muted when not talking

  2. Avoid interrupting each other

  3. Wear headphones to avoid echo

  4. Speak loud and clear

  5. Try noise cancelling apps.

You can find the most up to date information about data retention in our help center.