Skip to content


Whether you’re hosting a business meeting, a remote interview, or a customer training session, the right Google Meet settings make it easy to connect with colleagues, clients, or teams. With high-quality video, screen sharing, and handy collaboration tools, you’re doing yourself a disservice by not optimizing your experience for smoother, more productive calls.
This guide will walk you through everything you need to know about setting up Google Meet, from the basics to advanced features. Whether you’re a remote worker, a sales professional, or a customer success manager trying to keep teams aligned, we’ve got you covered.
By the end, you’ll know how to start meetings, customize settings, troubleshoot common issues, and even enhance your experience with handy integrations. Let’s dive in!
How to Get Started With Google Meet
Before you can host brilliant meetings, impress clients, or avoid awkward silences on video calls, you need to get Google Meet up and running. Keep in mind that Google Meet has over 300 million people actively using it every month, so if they can all do it, so can you. Whether you’re a total newbie or just need a refresher, this section will walk you through the basics.
We’ll start with:
- Creating a Google account
- Accessing Google Meet
In these sections, we’ll cover the basic Google Meet settings, including how to get started.
Creating a Google Account
Creating a Google account is a necessary first stop to getting started with Google Meet. If you already have a Google account, congratulations! You’re halfway there. If not, don’t worry! It only takes a minute to set one up.
How to Create a Google Account
If, somehow, you don’t already have a Google account (or you just fancy a fresh one), you can follow these simple steps to get started:
- Go to accounts.google.com and click Create account.
- Choose whether the account is for personal use or business (businesses get extra perks).
- Fill in your details: name, email, and password.
- Follow the verification steps (Google just wants to make sure you’re not a robot).
- And that’s it! You’re now an official Google account owner.
Free vs. Paid Google Meet Features
Now that you’re set up, let’s talk about what you get for free and what’s behind the paywall.
Free Google Meet:
- Up to 100 participants
- 60-minute time limit (plenty for most meetings, unless you’re running a really long brainstorming session)
- Basic screen sharing and background effects
Google Workspace (Paid Plans):
- Longer meeting durations (up to 24 hours for those serious meetings)
- More participants (150–500, depending on the plan)
- Advanced noise cancellation (so your dog’s barking doesn’t steal the spotlight)
- Meeting recordings, breakout rooms, and attendance tracking
For businesses, upgrading might be worth it, but for casual meetings or small teams, the free version does the job.
Accessing Google Meet
Now that you have a Google account, let’s look at the different ways to access Google Meet. You can:
- Use a web browser
- Use the Google Meet mobile app
- Access Google Meet via Gmail & Google Calendar
Let’s break each of these down into more detail.
1. Using a Web Browser
This is the easiest way to hop into a meeting. No downloads required, just:
- Go to meet.google.com.
- Click New Meeting to start a call or Enter a code if someone invited you.
- Grant access to your camera and microphone (don’t forget to run a Google Meet test beforehand).
- You’re in!
2. Using the Google Meet Mobile App
For meetings on the go, download the Google Meet app (available on Android & iOS). Then:
- Open the app and sign in with your Google account.
- Tap New Meeting to start a call or Join if you have a meeting code.
- Smile! You’re officially mobile-ready.
3. Accessing Google Meet via Gmail & Google Calendar
Google’s suite of work tools is designed to make life easier. They built Meet right into Gmail and Calendar so you can access it as easily as possible.
- In Gmail: Click the Meet tab on the left sidebar to start or join a meeting in seconds.
- In Google Calendar: Create a new event, and Google Meet automatically generates a meeting link. It’s perfect for scheduling ahead.
Now that you know how to access Google Meet, it’s time to actually start a meeting. Whether you’re hosting a quick team check-in or a full-blown presentation, setting up a meeting is simple. There are, however, a few tricks to make it even smoother. Let’s walk through how to create, schedule, and customize your Google Meet meetings like a pro.
How to Set Up a Google Meet Meeting
Alright, you’ve got Google Meet ready to go. GG! Now it’s time to actually start a meeting. Whether you need to jump on a quick call or schedule a client meeting days in advance, Google Meet makes it easy. Let’s go through the best ways to set up a meeting and make sure everyone gets an invite (so you’re not sitting there alone, wondering if your internet’s down).
We’ll cover:
- How to start a new meeting
- Inviting participants
Let’s explore each of these sections in more depth so that you’re ready to start your first call.
How to Start a New Meeting
Google Meet gives you two main ways to start a meeting: instantly or scheduled in advance. Which one you choose depends on whether you’re a last-minute chaos agent or a super-organized planner.
Option 1: Start an Instant Meeting (For when you need a call right now)
Starting an instant meeting is the quickest way to get into your call. If you just want to hop on a spontaneous call, this is the way to go:
- Go to meet.google.com and click New Meeting.
- Select Start an instant meeting.
- Grant access to your camera and microphone (don’t worry, your messy background isn’t visible yet).
- Boom! You’re in. Share the meeting link with others to invite them.
Don’t forget: from Gmail, you can also start a quick meeting by clicking the Meet tab on the left sidebar.
Option 2: Schedule a Meeting in Google Calendar (For those who like to plan ahead)
If you prefer to have your meeting schedule laid out in advance, you’ll need to schedule a meeting. This is just as easy. Just follow these steps:
- Go to Google Calendar and click Create (or just click a time slot).
- Add a title for your meeting (for example, Marketing Sync or Let’s Talk About That Email You Sent).
- Click Add Google Meet video conferencing. This automatically generates a meeting link.
- Set the date, time, and time zone so no one joins at 3 AM by accident.
- Add guests by entering their email addresses.
- Click Save, and Google will send invites with the meeting link included.
If you want to run a really professional meeting, make sure you set a meeting agenda. It’s a simple way to get everyone organized in advance.
Inviting Participants
Great, your meeting exists! Now, let’s make sure people actually show up. You have three options for this:
- Share the meeting link
- Send invites via email
- Add participants during the call
Let’s take a look at each one so you’re prepared from all angles.
Option 1: Share the Meeting Link
The easiest option for scheduled meetings is to share the meeting link. It’s just a hyperlink that participants can click on when it’s time for the meeting. Each and every Google Meet has a unique link (something like meet.google.com/abc-defg-hij). To invite people, simply:
- Copy the link and share it in Slack, WhatsApp, or email (or whatever else works).
- Anyone with the link can join, but if they’re outside your organization, they might need approval.
Option 2: Send Invites via Email
Another easy option is to just invite people via email. This makes sure the link doesn’t get lost as participants automatically get the meeting in their Calendar.
- If you scheduled the meeting in Google Calendar, invites are sent automatically.
- If you started an instant meeting, click Copy meeting invite and paste it into an email.
Option 3: Add Participants During the Call (For when you forgot someone! 👀)
If you’re already in the call and you realize somebody is missing (or you’re just inviting people on the fly), this is the best method:
- Click People (top right of the meeting screen).
- Click Add people and enter their email addresses.
- Google Meet will send them an invite, and they can join instantly.
Now that your meeting is set up and everyone’s in, it’s time to fine-tune your Google Meet settings to make sure your call runs smoothly. Let’s dive in!
How to Configure Your Google Meet Settings
Now that your meeting is up and running, let’s talk Google Meet settings. Sure, you could just roll with the defaults, but tweaking a few options can make a huge difference: better audio, smoother video, fewer distractions, and stronger security.
Whether you want to stop background noise from ruining your call, prevent random intrusions, or just make sure everyone actually hears you, this section has you covered. We’ll look at:
- Audio and video settings
- Security and privacy settings
- In-meeting controls
Let’s take a closer look at each one. After this, you’ll be a Google Meet whizz!
1. Audio and Video Settings
If your meeting looks like a pixelated 90s webcam feed or sounds like a robot speaking from the bottom of a well, it’s time to adjust your Google Meet settings.
There are a few options for audio and video:
- Choosing the right microphone, speakers, and camera
- Adjusting video resolution (for bandwidth optimization)
- Enabling background effects
- Enabling noise cancellation
Let’s break down each one so you feel empowered to change your audio and video settings on Google Meet whenever you need to.
Choosing the Right Microphone, Speakers, and Camera
This is one of the basic things you need to have in order to join a Google Meet call without causing a fuss. Here’s how you can check it all before people notice something’s wrong.
- Click the three dots (bottom right) in a meeting and select Settings.
- Under Audio, choose your preferred microphone and speakers (great if you use external gear).
- Under Video, select the correct camera (staring at a black screen or your ceiling fan isn’t the best first impression).
Always remember: you can use the Test button to check your mic before blaming your Wi-Fi. Make sure you have enabled permissions too. It’s the cause of more problems than you might think.
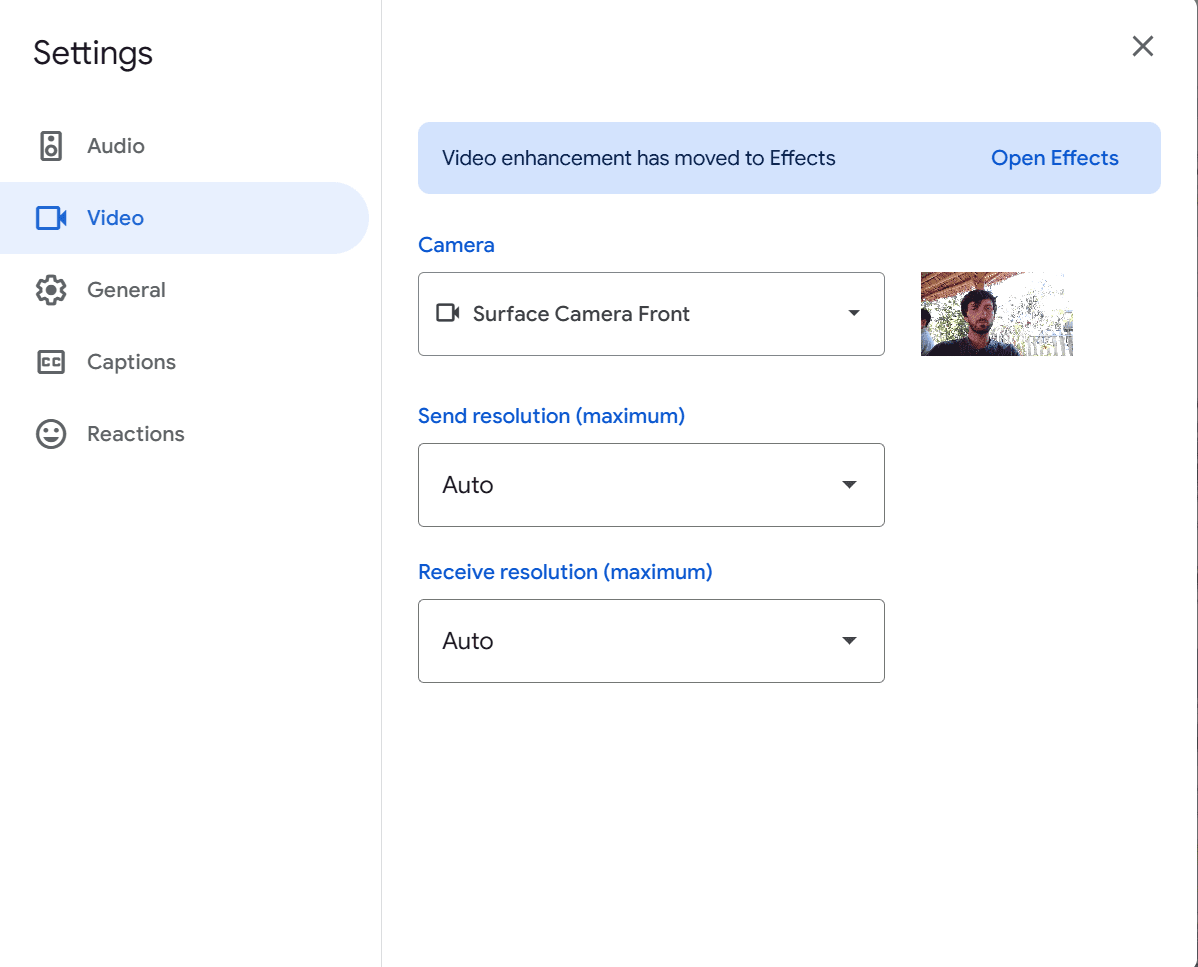
Adjusting Video Resolution (For Bandwidth Optimization)
If you suddenly look like a Minecraft character, it’s probably a bandwidth issue. Lowering your resolution can help. This (or increasing the resolution) can be done from your Google Meet settings.
Follow the same instructions as above to get started:
- Click the three dots (bottom right) in a meeting and select Settings.
- Click Video on the left panel.
- High-quality video? Set Send resolution and Receive resolution to 720p for a crisp feed.
- Slow internet? Drop both to 360p or lower to avoid the dreaded buffering freeze-frame.
Enabling Background Effects
Whether you want to blur out a messy room or transport yourself to a tropical beach, Google Meet’s background effects have you covered. Here’s how to enable them:
Before Joining a Meeting:
- Go to Google Meet and select a meeting.
- Before clicking Join, tap the Effects icon at the bottom right of your self-view. It should say Apply visual effects when you hover over it.
- Choose your background effect:
- Blur: Slight or strong blur to hide distractions.
- Pre-set Images: Select from Google’s backgrounds.
- Custom Background: Click Add (+) to upload your own.
- Animated Effects: Some backgrounds include subtle animations.
- Click Join Now to enter the meeting with your chosen effect.
During a Meeting:
- Click the three-dot menu (⁝) in the bottom right corner.
- Select Apply visual effects.
- Pick your preferred effect as outlined above.
- Close the menu. Your background will update instantly!
If your device struggles with performance, disabling background effects can help improve video quality.
Enabling Noise Cancellation
Google Meet’s noise cancellation feature helps filter out background distractions like barking dogs, keyboard clacking, or that one loud typist in the office. Here’s how to turn it on in Google Meet’s settings:
Before Joining a Meeting:
- Go to Google Meet and select a meeting.
- Click the three-dot menu (⁝) in the preview window.
- Select Settings and click Audio.
- Toggle Noise Cancellation On.
- Click Done, then join the meeting with crisp, distraction-free audio.
During a Meeting:
- Click the three-dot menu (⁝) in the bottom right corner.
- Select Settings and click Audio.
- Toggle Noise Cancellation On.
- Close the menu. Background noise should now be filtered out!
Beware: Noise cancellation works best for steady background sounds (like typing or fan noise) but may not completely block out sudden loud noises (like your cat knocking over a glass of water).
2. Security and Privacy Settings in Google Meet
Not all meetings need Fort Knox-level security, but no one wants unexpected guests crashing their call. Here’s how to lock things down and keep your meeting secure:
- Manage participant permissions
- Enable or disable screen sharing
- Lock meetings and remove participants
As always, let’s take a closer look at each one with a step by step guide so you can follow along in real-time.
Managing Participant Permissions
As a meeting host, you control who can join and what they can do. Here’s how to manage participant permissions:
- Click the Lock Icon 🔒 in the bottom-left corner to open Host Controls.
- Toggle Quick Access on or off:
- ON = Anyone in your organization can join without approval.
- OFF = Everyone must request to join manually (ideal for external meetings or preventing surprise drop-ins).
- You can also enable or disable:
- Chat (to prevent message spam).
- Reactions (if you want a more focused session).
- Microphone & Video Access (mute participants if needed).
Enabling/Disabling Screen Sharing
Want to control who can share their screen? It’s a handy setting to know if a colleague is supposed to be sharing a presentation but they don’t have permission (or if someone isn’t meant to be sharing but they’re insisting on wasting everybody’s time). Here’s how:
- Click the Lock Icon 🔒 (or go to Host Controls).
- Find the “Share Their Screen” option and toggle it:
- ON = Any participant can share their screen.
- OFF = Only the host can share.
- If someone accidentally starts screen-sharing their Slack DMs or cat videos:
- Click Stop Sharing on their feed to immediately cut off the screen share.
Locking Meetings & Removing Participants
Need to prevent late joiners or remove someone causing issues? It’s super easy for admins to control who’s allowed in and who isn’t during a call. Just go to your Google Meet settings and make the following changes. It’s slightly different for:
- Locking the meeting
- Removing participants
We’ll cover both!
Locking the Meeting
To lock a meeting and stop new people joining, follow these simple steps:
- Click the Lock Icon 🔒 at the bottom left.
- Toggle Lock Meeting on.
- Once enabled, no one else can join – even if they have the link.
Removing Participants
If someone’s being disruptive (or just forgot to mute themselves), you can remove them:
- Click People in the top-right corner.
- Find the participant’s name.
- Click More (⁝) and then Remove from meeting.
Remember: If you remove someone, they can’t rejoin unless you personally invite them back.
It’s also a good idea to enable the Waiting Room if your meeting involves sensitive information so you can manually approve attendees before they enter.
3. In-Meeting Controls in Google Meet
Once the meeting starts, you’ve got some powerful controls to keep things on track. Whether it’s muting a noisy participant, enabling captions, or managing chat and reactions, here’s how to take command of your meeting like a pro. We’ll show you how to:
- Mute/unmute participants
- Use captions for accessibility
- Enable/disable chat and reactions
Let’s dive into each one in more detail.
Muting/Unmuting Participants
Background noise can be a meeting’s worst enemy. Whether it’s keyboard clacking, a barking dog, or someone eating chips directly into their mic, you don’t have to deal with it anymore. You can mute them!
- Click the People tab (top-right corner).
- Find the participant you want to mute.
- Click More (⁝) and then Mute.
Don’t forget: You cannot unmute someone for privacy reasons. If they forget, you’ll have to remind them (or dramatically wave until they notice).
Using Captions for Accessibility
Live captions can be a lifesaver. It doesn’t matter whether you’re in a noisy coffee shop, have participants with hearing impairments, or just can’t understand that one coworker’s muffled mic, using captions is incredibly easy. Just remember: captions only appear for the person who enables them. They won’t be visible to other participants unless they turn them on too.
Here’s how you can do it:
- At the bottom of the screen, click Turn on captions (CC icon).
- Google Meet will now generate real-time subtitles for the conversation.
- Need to turn them off? Just click the CC icon again.
Enabling/Disabling Chat & Reactions
Meetings can get chaotic, especially when the chat turns into a meme war or reaction spam. As the host, you have access to the Google Meet settings that control how much interaction happens.
Managing Chat
Sometimes the chat is just a distraction. If you want pure focus, follow these steps to access Google Meet settings for chat control:
- Click the Lock Icon (bottom-left) to open Host Controls.
- Toggle Let participants send chat messages ON/OFF.
- ON = Free-flowing conversation (great for Q&As or brainstorming).
- OFF = No chat distractions (perfect for focused presentations).
Using Reactions
Reactions are a fun way to engage without interrupting:
- Click the Emoji Button (bottom-right).
- Choose from 👍😂🎉😮 and more.
- Your reaction will pop up on your video tile for everyone to see.
By fine-tuning these in-meeting controls, your Google Meet calls will be smoother, more secure, and way less stressful. But why stop there? Let’s take it a step further with some advanced features and integrations to truly level up your meetings.
Setting Up Advanced Google Meet Features
You’ve mastered the basics, wrangled your settings, and run a smooth meeting. Now, let’s kick things up a notch with some advanced features. We’ll cover:
- Recording meetings
- Breakout rooms and polls
- Integrating Google Meet with other tools
Let’s start with recording meetings, so no one can say, “Wait, did we actually decide that?”
1. Recording Meetings in Google Meet
Need to save an important discussion for later? Whether you’re capturing a client presentation, a training session, or just want proof that yes, Gary did agree to that deadline, Google Meet lets you record your calls (with some conditions). Let’s explore:
- How to record a Google Meet session
- Where to find recorded meetings
- Storage limitations and Google Workspace plans
- How to record Google Meet for free
How to Record a Google Meet Session
Recording is only available to Google Workspace users (sorry, free-tier folks!). If you’re in the free tier, scroll down to “How to Record Google Meet for Free“. If you’ve got a paid plan, follow these steps:
- Start or join a meeting.
- Click the More options (⁝) menu in the bottom right.
- Select Record meeting and confirm.
- A red dot appears, letting everyone know big brother is watching (just kidding, but all participants will be notified).
- To stop recording, go back to More options (⁝) and select Stop recording.
Where to Find Recorded Meetings
Once the meeting wraps up, the recording doesn’t just vanish into the void. Your Google Meet recording is saved in the cloud. Here’s where to find it:
- Google Drive: The file is automatically saved in the meeting organizer’s My Drive > Meet Recordings folder.
- Email Notification: The organizer and meeting starter will receive an email with the recording link.
- Google Calendar Event (If Scheduled): If the meeting was set up through Google Calendar, the recording link will also appear in the event details.
Storage Limitations & Google Workspace Plans
Before you go on a recording spree, keep in mind:
- Google Meet recordings take up space in your Google Drive. If you’re on a limited plan, those hour-long brainstorming sessions will eat into your storage.
- Free-tier users don’t get recording access. It’s available for Google Workspace editions like Business Standard, Business Plus, Enterprise, and Education Plus.
- Storage varies by plan:
- Business Starter: 30GB per user
- Business Standard: 2TB per user
- Business Plus: 5TB per user
- Enterprise: Basically unlimited (because who’s counting at that point?).
If you’re low on cloud storage, consider downloading Google Meet recordings to free up some space.
How to Record Google Meet for Free
For users on Google Meet’s free tier plan, you can still record your Meets. In fact, you can actually record, transcribe, summarize, and get AI-powered notes and timestamps on all your calls for free. To do this, follow these steps:
- Download the tl;dv Chrome extension.
- Create a tl;dv account and sync your Google Calendar. Alternatively, invite tl;dv to your current meeting.
- Enjoy unlimited recordings, transcriptions, and AI summaries of all your Google Meet calls for free, regardless of your Google plan.

2. Breakout Rooms and Polls
Sometimes, big meetings need smaller discussions – whether it’s a brainstorming session, a classroom activity, or just a sneaky way to avoid the main meeting (“Oh no, I got put in the breakout room… guess I can’t present!”). Enter Breakout Rooms and Polls, two features that add structure and engagement to your calls.
We’ll take a look at:
- Setting up breakout rooms
- Creating and managing polls and Q&A sessions
How to Set Up Breakout Rooms
Breakout Rooms let you split participants into smaller groups for focused discussions. This feature is only available for Google Workspace users, so if you’re on a free plan, you’ll have to settle for telling people to “just mute and discuss in the chat.”
Here’s how to create Breakout Rooms:
- Start or join a meeting.
- In the bottom right, click Activities and then Breakout rooms.
- Choose the number of rooms (you can have up to 100).
- Assign participants manually or let Google Meet do the work (random assignments = true democracy).
- Click Create and start the breakout session!
Remember: Hosts can join any breakout room to check in and make sure no one’s just talking about the latest Netflix show.
To end Breakout Rooms:
- Click Close rooms, and everyone gets pulled back into the main meeting.
How to Create & Manage Polls & Q&A Sessions
Polls and Q&A sessions turn boring monologues into interactive meetings. They’re great for gathering opinions, making decisions, and casually questioning authority. Let’s look at:
- How to create a poll
- Setting up a Q&A session
How to Create a Poll
Creating a poll is easy if you know your way around the Google Meet settings. Just:
- Click Activities and then Polls.
- Click Start a poll and type your question + answer choices.
- Hit Launch to send it to participants.
- View responses in real-time and close the poll when done.
Setting Up a Q&A Session
Sometimes, a Q&A is needed to gauge the room. It’s easy to set up:
- Click Activities and then Q&A.
- Participants can submit questions, and everyone can upvote the most relevant ones.
- Hosts can highlight key questions and manage the list.
3. How to Integrate Google Meet with Other Tools
Google Meet is great on its own, but it really shines when paired with other tools. Whether you’re collaborating on a document, running a project, or scheduling meetings without the back-and-forth, integrations make everything smoother. One area that enhances productivity is the use of notion integrations for virtual meetings, allowing teams to easily organize their agendas and notes in real-time. This ensures everyone remains on the same page, facilitating better communication and decision-making during discussions. Additionally, these integrations can streamline the follow-up process, making it easier to track action items and deadlines.
These integrations can be broken into two broad categories:
- Google Workspace apps
- Third-party integrations
Let’s take a look at both.
Google Workspace Apps (Drive, Docs, Sheets, etc.)
Google Meet plays well with all your favorite Workspace apps. That’s what Google Workspace is built for, really. Here’s how:
- Google Drive: Meeting recordings are automatically saved here.
- Google Docs, Sheets, & Slides: Collaborate in real-time during a call. Click Present now to share a document, or use Companion Mode to edit without blocking the video feed.
- Google Calendar: Schedule meetings effortlessly and auto-generate a Meet link. You can also add meeting attachments here to give participants all the relevant files before the call. No more “Where’s the agenda?” moments!
- Google Gemini: Great for automatically taking notes and providing meeting summaries, but there are lots of Gemini alternatives that do a better job.
Third-Party Integrations
We’ve already touched on how you can connect tl;dv to record and edit Google Meet for free, but there’s more you can do with that integration too. Not to mention, Google Meet also connects with tons of other third-party apps to streamline workflows:
- Slack: Start a Meet call directly from a chat.
- AI Meeting Assistants (tl;dv, Fireflies, Otter): Record, transcribe, and summarize your conversations. Employ AI to analyze your call recordings for insights that can inform strategy. Even get speaker analytics like talk time for sales calls and utilize AI-powered sales coaching to improve overall sales team performance.
- Project Management Tools (Asana, Trello, Notion): Link meetings to tasks and track action items with ease. When partnered with AI meeting assistants, you can assign tasks automatically based on conversational context.
- CRM & Sales Tools (Salesforce, HubSpot): Perfect for sales teams hopping between calls and customer data. Partnered with AI meeting assistants like tl;dv, you can automatically fill out your CRM based on the meeting notes taken from the recorded call.
Troubleshooting Common Google Meet Issues
Even the best meetings can go off the rails when tech decides to rebel. Whether it’s a silent presenter miming their entire speech (mic issues, obviously) or video feed that looks like it’s being streamed through a potato (low bandwidth strikes again), these fixes will get your meeting back on track. We’ll take a look at the following issues:
- Audio and video not working
- Connection and performance issues
- Troubleshooting meeting access issues
1. Google Meet Audio or Video Not Working
Audio and video are critical components to a video call. Without them, there is no communication. It stands to reason then that some of the most common issues revolve around audio and video not working. Instead of searching for years through Google Meet’s settings to find the answer to your problems, just check these quick solutions below and see if any of them work for you.
Fixing Microphone and Camera Issues
If people can’t hear or see you, don’t panic. Just try these super simple steps:
- Check your hardware. Make sure your mic and camera aren’t physically blocked (looking at you, sticky-note-over-the-camera crowd).
- Restart your browser. Close and reopen Chrome (or Edge, if you’re feeling adventurous).
- Check Meet settings. Click More options (three dots) then Settings then Audio & Video and make sure the correct mic/camera is selected.
- Test your mic & camera. Open your camera app or use an online mic test to see if they’re working outside Meet.
- Unplug & replug. Using external devices? Disconnect and reconnect them. USB ports can be weird.
- Try another browser or restart your device. The classic “turn it off and on again” method is popular for a reason.
Checking Browser Permissions
Google Meet wants to use your camera and mic, but your browser might be blocking it. Here’s how to check:
- Look for the camera/mic icon in your browser’s address bar. If there’s a red X or “blocked” icon, click it and allow access.
- Manually check permissions:
- In Chrome:
- Go to
chrome://settings/content/cameraandchrome://settings/content/microphone. - Make sure Meet (
https://meet.google.com) is allowed.
- Go to
- In Firefox/Edge/Safari: Check privacy settings (or site permissions) and ensure Meet has access to both microphone and camera.
- In Chrome:
2. Google Meet Connection and Performance Issues
Another big problem that a lot of people encounter when using Google Meet is connection issues. They might experience frequent lag or a pixelated video. This usually indicates that it’s something to do with your internet connection.
Dealing with Lag and Poor Video Quality
If your meeting turns into a pixelated mess, try these fixes:
- Lower video resolution. Click More options (three dots) then Settings then Video and switch to Standard (360p) or Audio only.
- Close background apps. Streaming Netflix, running 20 Chrome tabs, and downloading a game at the same time? Yeah, that’s not helping.
- Move closer to your Wi-Fi router. Walls, furniture, and even your own body can weaken the signal.
- Use a wired connection. Ethernet = Stability. If possible, plug in directly to avoid Wi-Fi hiccups.
- Restart your router. Again, the good old “turn it off and on again” often works wonders.
Optimizing Google Meet for Low Bandwidth
If you’re stuck with a slow connection (or your whole family is on a video call at the same time), try:
- Turn off your camera. Audio-only mode saves bandwidth.
- Disable background effects. Fancy virtual backgrounds take extra processing power.
- Mute yourself when not speaking. Reduces lag caused by unnecessary audio processing.
- Use the Meet mobile app. Sometimes, the mobile version is more optimized for poor connections.
3. Troubleshooting Google Meet Meeting Access Issues
If your audio and video are working fine, and your connection is perfect, the other big problem is getting into the meeting in the first place. Sometimes it can be a bit of a fiddle. Instead of deleting your accounts and rage-quitting Google, see if these solutions are helpful first.
Fixing “You Can’t Join This Meeting” Errors
If you’re locked out of a meeting like a vampire needing an invite, double check you’ve got the right meeting link. You should also ensure the host has already joined. Try:
- Check the meeting link. Copy-paste it directly into your browser. Sometimes links get weird when sent through messaging apps.
- Make sure the host has joined. If you’re early and the host isn’t there yet, you might see an error.
- Try an incognito window. If Meet is acting up, open a new incognito tab and try joining again.
Resolving Issues with Guest Access
If a guest (someone outside your organization) can’t join, the host must allow them in. Make sure you’re using the right Google account and ensure it’s not blocked:
- The host must allow them in. If “Quick Access” is off, the host needs to manually approve them.
- Use the right Google account. Guests should check if they’re signed in with the correct Google account (no, your work and personal accounts are not the same).
- If blocked by an admin, contact IT. Some organizations have security settings preventing guests from joining.
How to Upgrade Your Google Meet with tl;dv
We’ve mentioned tl;dv once or twice already, and for a good reason. When partnered with Google Meet (or Zoom or MS Teams) it’s your productivity super hack. Not only does it record, transcribe, and summarize all your meetings for free, it also provides AI agentic workflows for seamless automation with over 5,000 tools.
tl;dv excels because it uses AI agents for meetings to take your experience to the next level. Choose from a variety of meeting note templates to get your AI summaries in a specific format, or customize them to create your own! You can even use your CRM system’s input fields so that tl;dv’s AI fills out your CRM perfectly (and automatically) after every single call.
Additionally, tl;dv lets you record multiple meetings concurrently, and pull insights from multiple meetings at once. This is due to tl;dv’s AI having contextual understanding of all your calls. It remembers past discussions and can cross-reference topics across different calls by different speakers.
tl;dv: The Future of Sales
Imagine you’re a sales manager running your sales team’s calls through Google Meet: tl;dv lets you get recurring reports straight to your inbox that summarize your team’s meetings over any given time period. You can highlight focus areas, like pricing objections, competitor mentions, or feature requests. You’ll be able to quickly and easily jump through timestamps of all discussions that touch on these topics from all your sales reps’ calls.
McKinsey estimates that AI could contribute up to $4.4 trillion in added productivity from corporate use cases, while IBM claims they’ve already cut their decision-making time by 50%, enhancing business agility. Has the impact of AI agents on your business settled in yet?
While you could take notes with Google Gemini, it’s simply not as highly specialized as tl;dv. tl;dv even comes with a speaker analytics dashboard where you can get AI objection handling tips, sales coaching, and AI scoring.
To get started, all you need to do is get a tl;dv account. The free plan gets you unlimited recordings, transcriptions, and summaries, but it won’t get you all the big integrations or more advanced AI features. Either way, it’s a great idea to try it out. Before long, it’ll be your must-have Google Meet extension.
Key Features of tl;dv for Google Meet
tl;dv has dozens of top-tier features that can be utilized by Google Meet users. Here are some of the best ones:
- Automatic Transcriptions. Get crystal-clear, time-stamped transcripts of every conversation. Perfect for catching up without replaying the entire meeting.
- AI-Powered Summaries. No time to read through everything? tl;dv’s AI breaks down key points, action items, and decisions so you get the gist in seconds.
- Searchable & Shareable Notes. Need to find that one genius idea someone mentioned 30 minutes in? Just search the transcript and jump to the exact moment.
- Multi-Language Support. Conducting meetings in multiple languages? tl;dv transcribes and translates in over 40 languages, making global collaboration a breeze.
- Multi-Meeting Intelligence. Talk to an AI that remembers your past calls and can identify patterns and trends to suggest business-wide improvements.
- Sales Coaching. Get AI scoring, sales coaching, objection handling tips, and a powerful speaker analytics dashboard.
- Custom Meeting Note Templates. Use preset templates and popular sales playbooks like BANT, or create your own from scratch.
- Deep Integrations. Automate your workflows by syncing meeting notes directly with your CRMs, project management tools, and other work apps.
How to Install and Use tl;dv with Google Meet
If you can’t wait to get started with tl;dv, just follow this simple guide to get set up in minutes.
- Head to tl;dv’s website and sign up (it’s free to start!).
- Install the tl;dv Chrome extension. This enables automatic recording and transcription inside Google Meet.
- Join or start a Google Meet call. You’ll see tl;dv’s recording bot pop in to start capturing everything.
- Access your transcripts & summaries. After the meeting, find your neatly organized notes in your tl;dv dashboard.
Ready to Meet Like a Pro?
And there you have it – your ultimate guide to mastering Google Meet! From setting up meetings and fine-tuning settings to troubleshooting tech hiccups and supercharging your workflow with tl;dv, you’re now equipped to handle virtual calls like a pro. It’s all smooth, productive meetings from here on out.
But why stop here? Google Meet has plenty of hidden gems in its advanced settings, integrations, and AI-powered tools like Google Gemini, which can help streamline workflows even further. Take some time to explore features like automated captions, third-party add-ons, and deeper Google Workspace connections to make your calls even more efficient.
If you’re hungry for more, check out our deep dive, comparing G suite with tl;dv. Now go forth and host meetings that people actually enjoy!
FAQs About Google Meet Settings
How do I change my microphone, speaker, or camera in Google Meet?
- Click the three-dot menu (⋮) in the bottom-right corner of your meeting.
- Select Settings → Audio or Video tab.
- Choose your preferred microphone, speaker, or camera from the dropdown menus.
- Close the settings window, and you’re good to go!
How do I adjust video quality in Google Meet?
- Click the three-dot menu → Settings → Video tab.
- Under Send resolution, select Standard (360p) for lower bandwidth or High definition (720p/1080p) for better quality.
- Under Receive resolution, choose a lower option if you’re experiencing lag.
How do I enable background blur or virtual backgrounds?
- Before joining a meeting: Click Effects and select Blur or a background of your choice.
- During a meeting: Click the three-dot menu → Apply visual effects and choose your preferred effect.
How can I reduce background noise during a call?
- Click the three-dot menu → Settings → Audio tab.
- Turn on Noise cancellation to filter out background sounds like typing or barking dogs.
How do I control who can join or present in my meeting?
- Click the lock icon (Host controls) in the bottom-left corner.
- Toggle Quick Access on/off:
- ON = Anyone in your organization can join without approval.
- OFF = Everyone needs to be admitted manually.
- Toggle Screen sharing to control who can present.
Can I lock a Google Meet meeting?
Yes! Click the lock icon in Host controls and toggle Lock meeting to prevent new participants from joining.
How do I remove someone from a meeting?
- Click People (top-right corner).
- Find the participant, click their name, and select Remove.
- Once removed, they can’t rejoin unless invited again.
How do I enable captions in Google Meet?
- Click Turn on captions (bottom of the screen).
- Captions will appear in real-time for all participants.