


TL;DR: Best Audio-to-Text Transcription Tools
The quickest way to transcribe audio to text is to upload the recording to an AI transcription tool, select the spoken language, let the tool process it, and then review the transcript against the audio. For meetings, I use a meeting transcription tool because it can capture the call, identify speakers, create notes, and keep the recording linked to the text. For a one-off file, a free audio-to-text converter may be enough.
| Tool | Best for | Free access | Main limitation |
|---|---|---|---|
| tl;dv | Recurring meetings, interviews and customer calls | Unlimited live recordings and transcripts; 5 uploaded files | Uploaded files use generic speaker labels |
| Happy Scribe | Multilingual files, subtitles and translation | 10 AI minutes; unlimited meeting recordings up to 45 minutes each | Free file transcription is only a trial |
| Rev | High-stakes files and human-reviewed transcripts | 45 AI minutes per month in English | Free tier is English-only; paid beyond 45 minutes |
| Otter.ai | In-person, mobile and short meetings | 300 minutes per month; 30 minutes per conversation; 3 lifetime imports | Free imports run out quickly |
| Microsoft Word Transcribe | Occasional files for Microsoft 365 users | 300 uploaded minutes per month with an eligible subscription | No standalone free plan; availability varies |
My honest take is simple: use AI for the first draft and a human for the final check. Typing every word manually from scratch makes sense when the recording is short, highly sensitive, or so messy that using software would mean “more work”. For everything else, an AI tool will usually save a significant amount of time.
Table of Contents
What Does It Mean to Transcribe Audio to Text?
Transcribing audio to text means converting spoken words in an audio or video recording into written text. In most cases, the transcript may also include speaker labels, timestamps, captions, summaries, and action items, depending on the tool and the type of recording.
A basic transcript gives you the transcribed words in chunky paragraphs, but a useful one adds enough structure so you can do something with it. A useful transcript adds enough structure so you can do something with it.
New and modern transcription software can add several layers:
| Transcript feature | What it does | When to use |
|---|---|---|
| Speaker labels | Separates Speaker 1, Speaker 2, and so on | Interviews, meetings, panels |
| Named speakers | Links speech to actual participants | Live online meetings |
| Timestamps | Connects each line to a moment in the recording | Editing, quoting, checking accuracy |
| Search | Finds a word or topic across the transcript | Research and customer calls |
| AI summary | Condenses the recording into key points | Long meetings and lectures |
| Action items | Pulls out tasks, owners, and follow-ups | Work meetings |
| Clips | Turns a transcript section into a shareable video moment | Sales, research, training |
| Translation | Converts the transcript into another language | Multilingual teams |
This is why I would not choose an audio-to-text converter on accuracy alone. It is also important to consider what the transcribed audio looks like, or you’ll spend more time structuring it to make it useful.
How to Transcribe Audio to Text
To transcribe audio to text, all you need to do is choose a transcription method, upload or record the audio, select the correct language, generate the transcript, and review names, numbers, technical terms, and unclear sections before exporting the final text.
The basic workflow has five steps. The same process applies whether you call it transcription or simply need to convert audio to text.
- Choose the method – Decide whether you need a quick free transcript, a meeting record, professional human transcription, or a local offline tool.
- Prepare the audio – Use the cleanest version of the file you have. Avoid re-recording audio through laptop speakers unless a free workaround leaves you no choice.
- Select the spoken language – Do not assume automatic language detection will always get a multilingual recording right.
- Generate the transcript – Upload the file or let the tool join the live meeting.
- Review the risky parts – Check proper nouns, prices, dates, acronyms, accents, overlapping speech, and any sentence the tool could have marked incorrectly.
If the transcript is going into a blog, research report, legal document, medical record, or customer-facing asset, the fifth step is not optional.
4 Ways to Transcribe Audio to Text
There are four main ways to do it: an AI converter for existing files, a meeting notetaker for live calls, free built-in tools, and manual transcription. Here’s how I’d choose, depending on what you’re transcribing.
- To transcribe a recorded interview or turn a lecture into searchable notes, use an AI audio-to-text converter.
- To capture recurring work meetings, use an AI meeting notetaker that records and transcribes at the same time.
- To transcribe a single MP3 without paying for another tool, use Microsoft Word Transcribe if you already have Microsoft 365.
- To caption your own video, use an AI tool or YouTube’s automatic captions.
- To transcribe confidential material locally, run an open-source model like Whisper.
- To produce a court-ready or publication-critical transcript, use a human-reviewed transcription such as Rev.
- To transcribe a two-minute voice memo, use phone or document dictation.
Method 1: Use an AI Audio-to-Text Converter
An AI audio-to-text converter is the fastest way to handle a recording you already have. All you need to do is upload the file, set the language, and generate the transcript. Once that’s done, you can fix the names, numbers, and unclear parts, then download or share the file.
Most good AI transcribers read MP3, WAV, M4A, and MP4 directly. A 30-minute file is usually done in about two minutes, which saves you time and a few extra minutes to check its accuracy. A good converter keeps the audio, transcript, timestamps, and search together, so when a line looks wrong, you click it, hear what was said, and fix it on the spot.
If your recordings are mostly live meetings, though, a meeting notetaker (Method 2) saves you the upload step entirely and keeps speaker names attached.
Here are some of my top recommendations for AI transcribers:
HappyScribe

HappyScribe combines transcription, subtitles, translation, and human services in one platform. Its free plan includes a 10-minute trial for AI transcription, subtitling, and translation, plus unlimited meeting recordings capped at 45 minutes each.
I’d reach for it when the final output needs to become an editable transcript, subtitles, translated text, timed captions, a captioned video, or a transcript reviewed by another person. The 10-minute allowance is enough to see how the product works, but it won’t cover a normal podcast episode or a one-hour interview, so check the pricing before you process a larger batch.
Rev

Rev is the one to use when you want AI transcription but might also need a human-produced transcript. The free plan includes 45 minutes of AI transcription a month as well. Here are some more details on the pricing options Rev offers:
| Rev option | Best for | Price |
|---|---|---|
| Free | Occasional short files | 45 AI minutes/month (English only) |
| Pay-as-you-go AI | One-off files without a subscription | $0.25 per audio minute |
| Human transcription | High-stakes or legal recordings | $1.99 per audio minute |
| Essentials | Solo practitioners and bilingual files | $25.49 per seat/month (billed annually) |
| Pro | Firms needing bulk analysis and translation | $47.99 per seat/month (billed annually) |
I’d use the AI option for clear, low-risk recordings, and add human transcription when the exact wording carries a real consequence, such as a published interview, legal material, medical information, or a recording where several people repeatedly talk over one another.
Microsoft Word Transcribe

Microsoft Word Transcribe turns an uploaded recording into a speaker-separated transcript with timestamped playback. Eligible Microsoft 365 users can transcribe up to 300 minutes of uploaded audio a month, then edit the transcript inside Word, add it to an existing document, or save it as a new one. Availability depends on the Microsoft product, platform, and account type.
| Microsoft Word Strength | Microsoft Word Limitation |
|---|---|
| ✓Keeps the transcript inside a familiar document | ✗Requires an eligible Microsoft 365 account |
| ✓Separates speakers | ✗Not a dedicated transcription workspace |
| ✓Connects text to timestamped audio | ✗Not designed for managing many conversations |
| ✓Includes 300 uploaded minutes per month | ✗Availability varies across Microsoft environments |
Word is good for the occasional lecture, interview, or research recording you need as a document. It’s less suited to high-volume work like sales or recruiting, where you’re transcribing dozens of calls a month and need to search across them, because the transcript lives inside a single Word file and not in a searchable library.
Method 2: Transcribe a Live Meeting Automatically
To transcribe a live meeting, connect an AI meeting notetaker to Zoom, Google Meet, or Microsoft Teams, allow it to record the call with consent, and open the transcript and summary after the meeting ends. tl;dv is one of these: it records, transcribes, summarizes, and shares meetings across Google Meet, Zoom, and Microsoft Teams.
There are plenty of AI meeting notetakers now, and most cover the basics well. The differences show up in the details, like language coverage, CRM integrations, and free-tier limits. These are the three I’d shortlist.
| Tool | Best for | Free tier | Paid plans (billed annually) | Highlights |
|---|---|---|---|---|
| tl;dv | Recurring meetings, sales calls, and customer research | Unlimited recordings and transcripts | Pro $18 · Business $29 per seat/mo | 30+ languages with automatic detection, plus sync to HubSpot, Salesforce, and Pipedrive |
| Otter.ai | In-person recording, lectures, and mobile use | 300 minutes a month, 30 minutes per conversation | Pro $8.33 · Business $19.99 per user/mo | Strongest mobile app, though limited to 6 languages |
| Fireflies.ai | Audio-only global teams needing the widest language count | 400 mins of storage | Pro $10 · Business $19 per seat/mo | 100+ languages, though in our testing its accuracy came in lower, at around 91% |
tl;dv is my main recommendation. Based on our own testing, it came out the most accurate of the three, at around 97%. Otter is also a great option if you’re recording in person or on your phone. Fireflies covers more languages than tl;dv, though in our testing, its accuracy came in lower, at around 91%.
The difference from a converter is that the transcript stays attached to the meeting.
A basic transcript gives you the words in chunky paragraphs, but a meeting notetaker gives you the text, the recording, the speakers, the surrounding context, and the necessary tools to work on it.
If you want a deeper look at either tool, check out our full guides to Otter’s pricing and the best Fireflies.ai alternatives.
How to Transcribe Meeting Audio with tl;dv
To transcribe a live meeting, you don’t need to upload a file or run transcription as a separate step, because tl;dv records the call and has the transcript ready as soon as it ends.
- Connect your calendar – Google or Outlook connects automatically at sign-up, so tl;dv can auto-join meetings without you adding it each time.
- Set your recording preference – Choose auto-record for every meeting, internal or external only, or just the ones you join. Deny entry on any call individually.
- Let tl;dv capture the meeting – Bot joins Zoom and Teams once the host approves. On Google Meet, use the desktop app instead, since it records locally with no bot and no approval needed.
- Transcription runs live – Speaker labels, timestamps, and text generate automatically in 30+ languages as the meeting happens.
- Find the recording after – tl;dv emails you the notes and a link the moment the meeting ends, or open it from your dashboard.
- Review and use it – Clip key moments, generate an AI summary (10 free a month), export the transcript, or sync to Slack, HubSpot, Salesforce, or Pipedrive on paid plans.
tl;dv offers bot-free recording through its desktop app, which captures microphone and system audio without adding a notetaker bot to the call. Bot-free recording captures audio only, not video, screen sharing, or chat.
tl;dv can transcribe uploaded audio and video files as well, though it’s not its main feature. The uploaded files are automatically transcribed and summarized, and free users can upload up to five files in total over the life of their account. Each recording must be less than three hours. Speaker recognition isn’t available for uploads, so the transcript uses labels like “Speaker 1” and “Speaker 2.”
Method 3: Use Free and Built-in Transcription Tools
If you want to transcribe audio to text for free, there are a few free audio transcription tools worth checking out: Google Docs voice typing, YouTube automatic captions, and open-source speech-recognition software.
They can work for occasional audio, but they usually require more setup, real-time playback, file conversion, technical installation, or extra transcript cleanup.
A free converter and a workaround that costs nothing are not the same thing.
Option A: Google Docs Voice Typing

Google Docs voice typing listens through your microphone and converts live speech into text. It’s designed for dictation rather than uploading a file, so the common workaround is to play the recording through speakers while Google Docs listens through the mic. That comes with a few catches:
- the entire recording has to play in real time
- background noise can interfere
- speaker labels aren’t added
- replaying the audio can reduce clarity
- the full transcript still needs review
A 45-minute recording takes at least 45 minutes to play through before you can start editing. It costs nothing, but it’s slow, and the sound quality drops when audio travels from speakers back into a microphone.
Option B: YouTube Automatic Captions
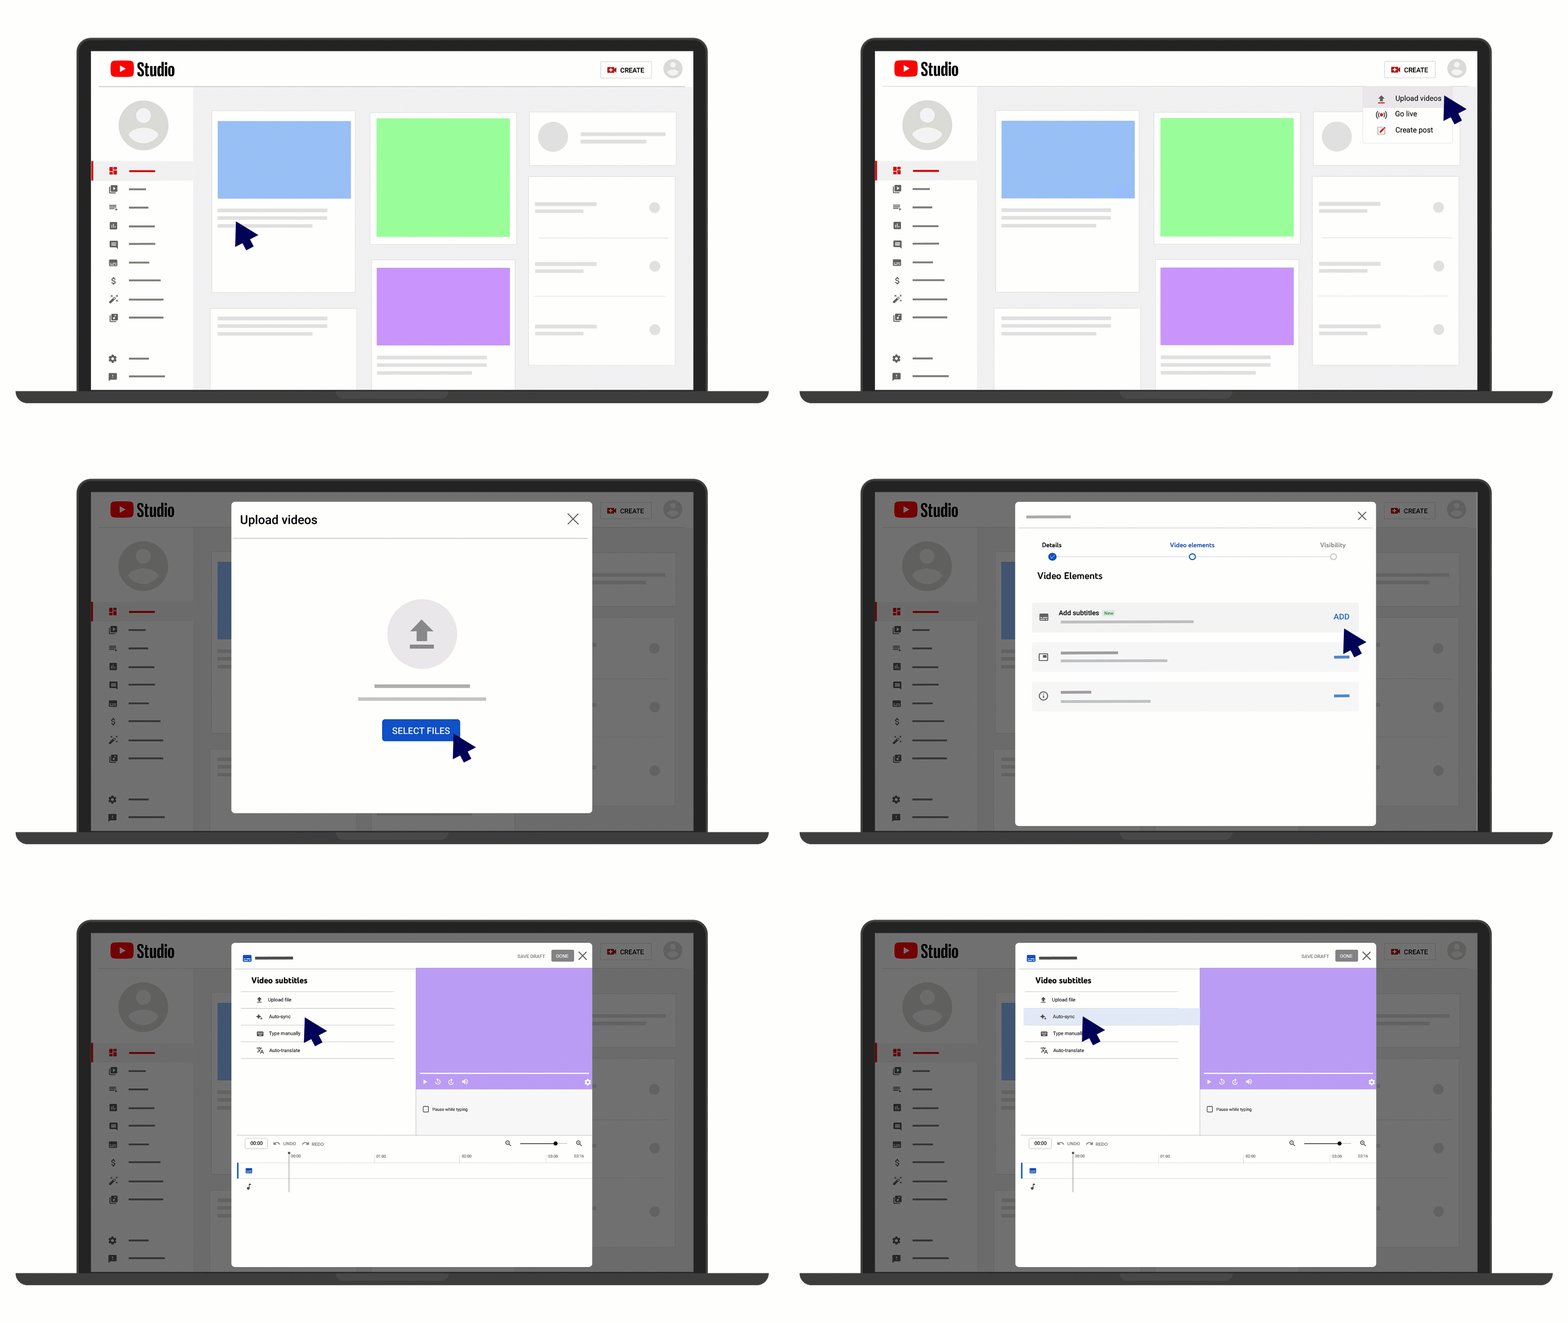
YouTube can automatically caption uploaded videos in many languages, but it cannot accept a standalone audio file. You first need to turn the audio into a video by adding a static image, uploading it, waiting for processing, and then reviewing or downloading the captions.
YouTube itself warns that automatic captions can misrepresent speech because of accents, dialects, mispronunciations, overlapping speakers, or background noise. It is useful for video creators already working in YouTube Studio. It is an unnecessarily public-shaped route for a private interview transcript, even when the upload is set to private.
Option C: Run an Open-Source Model Locally

OpenAI’s Whisper is a general-purpose model for multilingual speech recognition, translation, language identification, and voice activity detection. Running it locally can be attractive when you want more control over where the file is processed.
The trade-off is setup. You need compatible software, FFmpeg, suitable hardware, and the confidence to troubleshoot command-line errors. There may be no per-minute bill, but setup and maintenance still cost time.
| Free option | Direct file upload | Runs in real time | Main limitation |
|---|---|---|---|
| Google Docs voice typing | ✗No | ✓Yes | Must replay audio through a microphone |
| YouTube captions | ~Video only | ✗No | Audio must be converted to video first |
| Local Whisper | ✓Yes | ~Depends on hardware | Technical setup and manual workflow |
| tl;dv free plan | ✓Yes, limited uploads | ✗No | Upload count differs from unlimited live meetings |
| Microsoft Word | ✓Yes | ✗No | Requires Microsoft 365 and has a monthly minute cap |
Some tools limit minutes, some limit files and others require an existing subscription. A few cost nothing but consume an hour of your day to transcribe an hour of audio.
Method 4: Transcribe Audio to Text Manually
Manual transcription means listening to the recording and typing every word yourself. It gives you direct control over wording and context, but it requires repeated pausing, rewinding, speaker labeling, timestamping, and proofreading.
Manual transcription is useful, though rarely the best first step for a long, clear recording. I would consider it when any of these apply:
I would only consider it when:
- the clip is only a few minutes long
- the audio contains sensitive information that cannot be uploaded
- exact wording matters more than turnaround time
- the recording has heavy cross-talk or poor sound
- a human needs to verify every line anyway
A better hybrid workflow is to generate an AI transcript first, then manually correct it while listening at 1x or 1.25x speed. You keep human judgment without spending the first pass typing every predictable word.
I recommend a few handy tools and tips that make the manual work faster and more accurate:
- Closed-back headphones – hear quiet words and reduce distractions
- Player with keyboard shortcuts – pause and rewind without leaving the document
- Text expander – insert repeated names, labels, and phrases
- Style guide – keep numbers, filler words, and interruptions consistent
- Timestamp rules – decide when timestamps should appear
- Second review pass – catch omissions and invented wording
For professional transcripts, decide whether you need verbatim or clean verbatim text before you start. Verbatim keeps fillers, repetitions, false starts, and non-speech sounds. Clean verbatim removes the clutter while preserving meaning. Changing the standard halfway through creates a transcript that looks like two people edited it during a minor disagreement.
How Accurate Is Audio-to-Text Transcription?
Transcription accuracy depends on audio quality, background noise, accents, speaker overlap, language support, technical vocabulary, microphone distance, and the tool’s speech model. Measure it with word error rate rather than trusting a single marketing percentage.
Accuracy claims are difficult to compare because vendors test different recordings under different conditions.
A software or tool can excel on a clean podcast and struggle with overlapping speakers in a cafe. Both results still belong to the same product.
The standard measure is word error rate, or WER.
WER = (substitutions + deletions + insertions) ÷ total words in the correct transcript × 100
For example, imagine the verified transcript contains 500 words. The AI output has 22 substituted words, eight missing words, and five inserted words.
WER = (22 + 8 + 5) ÷ 500 × 100 = 7%
A simplified accuracy score would be 93%, although WER is the cleaner way to report the result.
What Affects Transcription Accuracy Most?
| Factor | Better result | Worse result |
|---|---|---|
| Microphone | ✓Close, dedicated microphone | ✗Laptop mic across a large room |
| Background | ✓Quiet room | ✗Music, traffic, keyboard noise |
| Speakers | ✓One person at a time | ✗Frequent overlap and interruptions |
| Language | ✓Explicitly supported language or dialect | ✗Unsupported or incorrectly detected language |
| Vocabulary | ✓Common words and supplied context | ✗Acronyms, brand names, medical or legal terms |
| Recording | ✓Original high-quality file | ✗Re-recorded or heavily compressed audio |
| Delivery | ✓Clear, steady speech | ✗Whispering, shouting, or very fast speech |
For anything important, test the tool on a representative five-to-ten-minute sample before processing a large archive. Do not test it on the cleanest clip you have if the remaining 40 hours were recorded in a warehouse.
How to Improve Audio Transcription Accuracy
There are a few practical steps you can take to improve the transcription quality.
- Move the microphone closer – Distance adds room echo and competing sound.
- Use one microphone per speaker when possible – Separate audio tracks make speaker handling easier.
- Stop people talking over each other – This is good advice for transcripts and meetings generally.
- Record the correct input – Check that your system captured the external microphone rather than the laptop mic.
- Choose the exact language or dialect – “English” is not always specific enough when the tool supports regional variants.
- Keep the source file – Do not compress it repeatedly before transcription.
- Create a correction list – Note participant names, company names, acronyms, product terms, and unusual locations.
- Review with timestamps – Jump to risky passages rather than reading the entire transcript without audio.
I would always review these five categories first: names, numbers, dates, negatives, and decisions. “We can launch” and “we can’t launch” are separated by one character and a fairly significant project outcome.
Best Audio File Formats for Transcription
WAV and FLAC preserve more audio detail and are strong choices when quality matters. MP3 and M4A are smaller and easier to share. A clear recording in a compressed format will usually transcribe better than a noisy recording saved as a lossless file.
File format matters less than recording quality. A WAV file does not repair a distant microphone, and converting a bad MP3 into a WAV only creates a larger, bad file.
| Format | Compression | File size | Good for | Main limitation |
|---|---|---|---|---|
| WAV | Usually uncompressed | Large | Interviews, source recordings, editing | Slow uploads and storage use |
| FLAC | Lossless compression | Medium to large | High-quality archives | Not accepted by every basic tool |
| MP3 | Lossy compression | Small | Sharing, podcasts, common uploads | Very low bitrates remove detail |
| M4A/AAC | Lossy or lossless, depending on the codec | Small to medium | Phone recordings and Apple workflows | Codec support can vary |
| OGG/Opus | Efficient compression | Small | Web and voice applications | Less familiar to non-technical users |
| MP4/MOV | Video container with audio | Medium to large | Recorded calls, webinars, and interviews | Upload time includes video data |
If you’re specifically working with a WAV file, we’ve got a full guide on how to transcribe WAV to text.
Use the original file whenever possible. If the tool does not accept it, convert once into a supported format. Repeated conversion between lossy formats can make speech less clear.
Transcribe Audio to Text in Multiple Languages
Most AI transcription tools now handles more than one language, but coverage varies by feature, so a tool that transcribes 30 languages may translate or caption far fewer. Check the specific language against the specific job before you commit.
tl;dv transcribes in 30+ languages with automatic detection, so you don’t have to set the language before every call. It also translates transcripts, which helps distributed teams read the same meeting in their own language. On Business and Enterprise plans, the Whisper model can handle more than one language spoken within a single meeting.
One thing to confirm is whether a tool transcribes in the original language or quietly translates to English by default. They are not the same output, and the difference matters most on the recordings you can least afford to get wrong.
So, Which One Should You Use?
There is no “perfect” tool. The choice comes down to what you’re transcribing. the language and your accuracy expectations and budget.
For an existing audio or video file, a dedicated converter is the most direct route. HappyScribe suits multilingual files, subtitles, and translation. Rev is the one to reach for when the wording carries a real consequence, since it offers both AI and human transcription. If you already pay for Microsoft 365, Word Transcribe handles the occasional file without another subscription. tl;dv can also take a handful of uploads if you want them sitting alongside your meetings, though a converter is cleaner for a one-off MP3.
For a live call, an AI meeting notetaker saves the upload step and keeps the transcript tied to the speakers and the recording. If accuracy is non-negotiable, a human transcriber is still the safest option, and running Whisper locally keeps a sensitive file on your own machine.
The quickest way to see what fits is to try one on a real recording. If most of your audio comes from meetings, tl;dv’s free plan is a low-commitment place to start, since you can record and transcribe your next call without paying or setting anything up.
FAQs About Transcribing Audio to Text
Can I Convert an MP3 to Text?
Yes. MP3 is one of the most widely supported formats for audio transcription. Upload the original MP3 to a transcription tool, select the language, generate the transcript, and review names, numbers, and unclear passages.
How Long Does It Take to Transcribe Audio to Text?
AI tools usually process audio faster than manual transcription, but the exact time depends on file length, size, server demand, model, and upload speed. Google Docs workarounds run in real time, so a 60-minute file takes at least 60 minutes before editing. Manual transcription takes longer because of pausing, rewinding, speaker labels, and proofreading.
Can ChatGPT Transcribe Audio to Text?
ChatGPT can work with audio in supported experiences, but the right workflow depends on the product surface, file limits, privacy requirements, and whether you need timestamps, speaker labels, captions, or a reusable meeting library. For recurring meetings, a dedicated meeting transcription tool is usually easier to manage.
What Is the Difference Between Transcription and Dictation?
Dictation converts the speech you are saying now into text. Transcription converts an existing or live recording into a structured written record. Dictation tools usually assume one speaker. Transcription tools are more likely to support files, timestamps, multiple speakers, and playback.
Is AI Transcription Safe for Confidential Audio?
It depends on the provider, plan, storage settings, data-processing terms, and your organization’s policies. Check where recordings are stored, how long they are retained, who can access them, whether they are used for model training, and whether you can delete or restrict sharing. Highly sensitive audio may require an approved enterprise service, local processing, or human transcription under contract.