Skip to content


If you’re wondering how to record a meeting in Zoom these days of craze, you came to the right place.
This guide is designed for anyone who wants to master Zoom recordings with confidence and ease. Whether you’re a CEO ensuring team alignment, a teacher engaging students in online learning, or a freelancer juggling multiple client projects, you’ll find actionable advice tailored to your needs. New to Zoom and need help getting started? We’ve got you covered. Already a Zoom wizard but curious about advanced features? You’ll find pro tips here too.
Recording Zoom meetings has become an indispensable part of modern workflows, whether you’re a business professional managing key client calls, an educator delivering virtual lessons, or part of a remote team brainstorming your next big idea. With the rise of remote work and hybrid setups, the ability to revisit conversations, capture important details, and share recordings has shifted from being “this is quite handy” to a critical skill for efficiency and collaboration.
What sets this guide apart is its depth and scope—it’s the ultimate one-stop shop for everything you need to know about recording on Zoom in 2026. Throughout this article, you’ll find links to detailed guides we’ve created on specific features, troubleshooting common issues, and even maximizing the productivity of your Zoom calls.
Are Zoom Meetings Recorded?
Zoom meetings are not recorded automatically—something that often surprises first-time users. By default, Zoom prioritizes privacy, leaving it up to the host to decide whether a meeting should be recorded. This means that unless the host actively enables the recording feature, those critical discussions or hilarious team moments might not be captured for posterity.
To record a Zoom meeting, the host must first enable the recording option within their account settings. This feature isn’t one-size-fits-all; it can be customized to allow either local recording, where files are saved directly to a device, or cloud recording, which stores them securely online. Once enabled, the host has full control over who else can record. Participants can only hit the record button if the host explicitly grants them permission during the meeting, ensuring that sensitive information stays protected.
If you’re a participant hoping to record but find the option grayed out, don’t panic—just politely ask the host to grant you recording rights. Keep in mind that transparency is key; all participants will receive a notification whenever a meeting is being recorded, so there are no surprises.
For a step-by-step guide on enabling recording, setting permissions, and making the most of Zoom’s recording features, check out our comprehensive article on how to record any type of meetings.

Can You Record a Zoom Meeting?
Yes, you can absolutely record a Zoom meeting, but there are a few things you’ll need in place first. The ability to record depends on permissions granted by the host, as well as the type of Zoom account you’re using. For hosts and co-hosts, recording is a built-in feature, but participants can only record if the host gives them explicit permission. Once granted, you’ll also need to decide whether to save your recording locally (on your device) or to the cloud (available for licensed accounts).
Ready to hit record? Here’s a quick guide to get started:
- Check Permissions: Ensure you’re either the host, a co-host, or a participant with recording rights.
- Select Local or Cloud Storage: Local recordings are saved directly to your computer, while cloud recordings require a licensed account and are stored online for easy access.
- Start Recording: In the meeting, click the “Record” button in the toolbar. Choose “Record on this Computer” for local storage or “Record to the Cloud” if available.
- Manage the Recording: Use the controls in the toolbar to pause, resume, or stop recording. Once the meeting ends, local recordings will process on your computer, while cloud recordings will appear in your account.
For a detailed walkthrough, including advanced tips for optimizing storage and playback options, head over to our guide on how to record Zoom meetings if you’re not the organizer.
Why Recording a Meeting on Zoom?
So why would you record on Zoom? There are many different reasons why this could be incredibly helpful, or even legally sensible. Here is a a quick and dirty guide on the times, roles and reasons why it might be beneficial.
Use Cases for Recording a Zoom Meeting Across Industries
Zoom recordings are versatile tools that cater to a wide range of industries, enhancing workflows and improving accessibility:
- Education: Professors and teachers use Zoom to record lectures and virtual classrooms, creating a repository of content that students can revisit anytime. This is especially beneficial for remote or hybrid learning setups.
- Healthcare: Telemedicine has become a cornerstone of modern healthcare. Recording consultations (with patient consent) allows doctors to maintain detailed records, review cases, and share insights with colleagues while staying compliant with privacy regulations like HIPAA.
- Legal: Lawyers frequently use Zoom to record depositions, client consultations, and strategy meetings. These recordings serve as valuable reference points for case preparation.
- Corporate Training: Companies record onboarding sessions and employee training programs to create reusable resources for future hires, saving time and resources.
The Benefits of Recording Meetings
- Improved Accountability: Recordings document discussions, decisions, and commitments, reducing misunderstandings.
- Facilitates Asynchronous Work: For distributed teams, recordings enable team members in different time zones to catch up on key points without needing to attend live.
- Knowledge Repository: Saved recordings become valuable resources for future reference, from project insights to brainstorming ideas.
How to Record Zoom Meeting as a Host?
Recording a Zoom meeting as a host is straightforward, but it all starts with enabling the feature in your account settings. Whether you’re using Zoom for work, school, or personal projects, hosting gives you the ultimate control over when and how your meetings are recorded. Here’s how to do it:
- Enable Recording:
Log in to your Zoom account via the web portal and navigate to Settings. Under the Recording tab, ensure that local and/or cloud recording is toggled on. This step is crucial to unlock recording capabilities during meetings. - Start Recording in a Meeting:
Once you’re hosting a meeting, click the Record button in the toolbar at the bottom of the screen. You’ll be prompted to choose between Record on this Computer (local recording) or Record to the Cloud (available with licensed accounts). - Control the Recording:
Use the recording toolbar to pause, resume, or stop as needed. At the end of the meeting, the recording will automatically process and be saved to your designated location.
Want to record Zoom meetings on your laptop or PC even if you’re not the host? Check out our detailed guide on how to do just that.
How to Record Zoom Meeting as a Participant?
Recording a Zoom meeting as a participant requires a bit of coordination with the host. Since Zoom prioritizes privacy and control, participants cannot record meetings by default unless the host explicitly grants them permission. However, there are ways to work within and around these restrictions, depending on your needs and the situation.
Getting permission to record your meeting on Zoom
If you need to record a Zoom meeting and the host hasn’t enabled recording for participants, the first step is simple: ask. During the meeting, politely request the host to grant you recording privileges. Here’s how they can do it:
- Host Grants Permission: The host clicks Participants in the toolbar to open the participant list.
- Enable Recording for You: The host hovers over your name, selects More, and clicks Allow Record. Once done, you’ll see a recording button appear in your toolbar.
Once you have recording privileges, follow these steps to record:
- Click the Record button in your meeting toolbar.
- Choose Record on this Computer for local storage (if enabled by the host).
- Use the toolbar to pause, resume, or stop the recording as needed.
- After the meeting, your recording will be processed and saved in the designated folder.
Remember, all participants will be notified that the meeting is being recorded when this feature is in use.
How to record Zoom meeting as a participant without host permission
Sometimes, you may need to record a meeting but can’t obtain host permission. While Zoom itself won’t allow recording without host approval, tools like tl;dv can help. Designed for teams looking to optimize meeting productivity, tl;dv is an approved Zoom add-on that allows you to capture, transcribe, and even timestamp key moments in your calls—no host intervention required. It’s particularly useful for remote teams and individuals who want to stay organized without waiting for permissions.
For alternative solutions, check out our Guide to Recording Zoom Without Host Permission. It covers practical workarounds while emphasizing the importance of respecting privacy and compliance rules.
How to keep meeting recordings on the ethical side of things?
Regardless of the method you choose, transparency is key. Recording a Zoom meeting without the host’s knowledge, or without consent, may breach trust—or worse, violate legal regulations. Always aim to communicate clearly with everyone involved to ensure smooth collaboration and respect. With tools like Zoom and tl;dv, capturing important moments is easier than ever, as long as it’s done responsibly.
How to Record Yourself on Zoom?
Recording yourself on Zoom is a straightforward process, whether you’re practicing a presentation, recording a tutorial, or creating content. You can do this by starting a meeting where you’re the sole participant. This setup allows you to focus solely on your own video and audio, ensuring a clean recording without distractions.
Here’s how to record yourself:
- Open Zoom and start a new meeting.
- Ensure your microphone and camera are turned on.
- Click the Record button in the meeting toolbar.
- Choose either Record on this Computer or Record to the Cloud, depending on your account type.
- Deliver your content as planned. Once finished, click Stop Recording or simply end the meeting to process your file.
For detailed step-by-step instructions, check out our detailed guide for more information on recording yourself on Zoom.
How to Ensure High-Quality Recordings On Zoom?
Optimizing Audio and Video Settings
- Audio: Use an external microphone to capture clear, professional-quality sound. Ensure your microphone is positioned correctly and test it before the meeting.
- Video: Invest in a high-resolution webcam to improve visual clarity. Ensure your background is clean and well-lit to create a professional appearance.
Eliminating Background Noise
Zoom offers built-in noise suppression tools that filter out background sounds, such as typing or fan noise. You can activate this feature under Settings > Audio and adjust the suppression level to suit your environment.
Recording Etiquette for Professional Meetings
- Always inform participants that the meeting will be recorded.
- Encourage attendees to mute their microphones when not speaking to reduce noise.
- Test your setup beforehand to avoid technical issues during the recording.
Where Is the Recording Button on Zoom?
Finding the recording button on Zoom is key to capturing your meetings, and its location varies slightly between desktop and mobile interfaces.
Zoom Recording Button On Desktop
The recording button is located on the toolbar at the bottom of your Zoom meeting screen. You’ll see it labeled as Record (a small circle icon). If you’re the host or have been granted recording permissions, clicking this button will start the recording. You’ll then see controls to pause, resume, or stop the recording.
If you don’t see the recording button, check with the host to ensure permissions have been granted or confirm that the feature is enabled in your Zoom account settings.
Zoom Recording Button On Mobile
On the Zoom mobile app, the recording button is located under the More menu, represented by three dots at the bottom-right corner of your screen. Tap More, then select Record to the Cloud (local recording is not available on mobile).
Want to know more about storing Zoom recordings? Find out more about how long you can (and should you) store Zoom calls for.
How to Record a Zoom Meeting on the Zoom App?
Recording a Zoom meeting on the mobile app is slightly different from the desktop version, but it’s just as simple once you know the steps. Both iOS and Android users can record meetings using Zoom’s built-in tools, though cloud recording is the only option available (local recording is not supported on mobile).
Step-by-Step Instructions for iOS and Android
- Start or Join a Meeting: Open the Zoom app and either host or join the meeting where you want to record. Note that recording is only available to the host or participants with recording permissions.
- Access the Recording Option: During the meeting, tap the More button (three dots) in the bottom-right corner of the screen.
- Start Recording: Select Record to the Cloud. Once you tap this, Zoom will begin capturing the meeting, and a notification will appear to all participants indicating that the session is being recorded.
- Manage the Recording: You can pause or stop the recording anytime by tapping More and selecting the respective option.
- Retrieve Your Recording: After the meeting ends, the recording will be processed and saved to your Zoom cloud storage. You can access it by logging into your Zoom account on a browser and navigating to the Recordings tab. From there, you can download, share, or manage your recordings.
Key Differences Between iOS and Android
- Interface Layout: While the steps are nearly identical, the Zoom app’s layout might look slightly different on iOS and Android devices. The More button and cloud recording options are in the same place, but icons and spacing may vary slightly.
- Permissions: Ensure your app permissions are configured correctly, particularly for microphone and storage, as Android users may need to grant additional permissions compared to iOS users.
Limitations and Alternatives
Keep in mind that cloud recording requires a licensed Zoom account. If you’re using the free version or need additional flexibility, third-party tools like tl;dv can be integrated with the app to provide enhanced recording and transcription features.
How to Record a Zoom Meeting on Your Phone?
Recording a Zoom meeting on your phone is straightforward, but there are a few key things to know. Unlike the desktop version, the Zoom mobile app only supports cloud recording, and this feature is available exclusively for licensed accounts.
To start recording on your phone:
- Open the Zoom app and join or host a meeting.
- Tap the More button (three dots) in the bottom-right corner.
- Select Record to the Cloud to begin recording. A notification will appear, letting all participants know the meeting is being recorded.
- To pause or stop, tap More again and choose the relevant option.
Once the meeting ends, your recording will be processed and saved in the cloud. You can access it later through your Zoom account online.
For a more detail guide on recording a Zoom meeting on your phone, take a look at our piece on How to Record Google Meet, Teams, and Zoom on a Phone/Tablet.
How to Use a Zoom on your Laptop?
Recording a Zoom meeting on your laptop is a breeze, thanks to its intuitive interface and flexibility. Whether you prefer saving your recordings locally or in the cloud, the process is straightforward.
To record on your laptop:
- Start or join a Zoom meeting on the desktop app.
- Click the Record button in the toolbar at the bottom of the screen.
- Choose Record on this Computer for local storage or Record to the Cloud if you have a licensed account.
- Use the recording controls in the toolbar to pause, resume, or stop the recording as needed.
- Once the meeting ends, local recordings are processed and saved in your computer’s designated folder, while cloud recordings are stored in your Zoom account for easy access and sharing.
How to Screen Record on Zoom?
Screen recording on Zoom is a powerful way to capture meetings, presentations, or webinars for future reference. While Zoom offers built-in recording tools, there are times when participants may need alternatives if host permissions aren’t granted. Let’s explore both options—and why ethics should always remain at the forefront.
Using Zoom’s Built-In Recording
Zoom makes it easy for hosts and authorized participants to record meetings, including shared screens. Simply click the Record button in the toolbar and select either Record on this Computer or Record to the Cloud. If someone shares their screen, it’s automatically included in the recording, ensuring a comprehensive capture of the session. Optimize clarity by enabling Share Screen Settings in Zoom before recording.
Using tl;dv for Enhanced Screen Recording
If you’re looking for an alternative that doesn’t rely on host permissions, tl;dv is an excellent option. This Zoom-approved tool allows participants to record meetings while generating real-time transcriptions and timestamps, making note-taking effortless. The best part? tl;dv integrates seamlessly with Zoom, ensuring you’re not violating any policies or overstepping ethical boundaries.
When using tools like tl;dv, always be transparent. Inform the host and participants that you’re recording, even if permissions aren’t explicitly required. Transparency builds trust and avoids any unintended breaches of privacy or terms of service.
Third-Party Tools Without Permissions
If you don’t have access to tl;dv or host permissions, third-party tools like OBS Studio or Loom can screen record directly from your Zoom meeting window. However, this is where ethics become critical. Recording without notifying participants may violate Zoom’s terms and even local privacy laws. Always prioritize consent and communication when using external tools.
How to screen record on Zoom without permission
Technically, yes, this can be done, but it’s not recommended. Recording without consent can violate privacy laws and Zoom’s terms of service. If you still want to explore the technical side of how it’s done, we break it down in detail here. Remember to always ask for consent when recording a meeting.
How to Share a Recorded Zoom Meeting?
Sharing your recorded Zoom meetings is simple, whether you’ve saved them to the cloud or locally on your computer. Here’s how to do it:
Cloud Recordings
- Log in to your Zoom account through a web browser.
- Navigate to the Recordings tab and select the recording you want to share.
- Click Share and adjust the settings—choose whether viewers need a passcode, can download the file, or only view it online.
- Copy the generated link and share it with your participants via email, messaging apps, or your team’s platform.
Local Recordings
- Locate the file on your computer (by default, it’s saved in the Zoom folder under Documents).
- Upload the file to a sharing service like Google Drive, Dropbox, or OneDrive.
- Generate a shareable link and send it to your intended audience.
Legal and Ethical Considerations When Recording
Transparency and Consent
Recording participants without their consent is not only unethical but may also breach legal requirements. Zoom addresses this with built-in notifications that alert participants when a meeting is being recorded. However, it’s good practice to verbally inform everyone at the start of the session.
Compliance with Local Laws
Different countries have varying laws about recording conversations:
- GDPR (Europe): Requires explicit consent from all parties.
- HIPAA (USA): Demands secure storage and access for healthcare-related recordings.
Ethical Alternatives for Sensitive Meetings
For discussions where recording may feel intrusive, tools like tl;dv offer a middle ground by providing summaries and key highlights instead of full recordings.

What’s Zoom AI Companion?
Zoom AI Companion is an integrated generative AI assistant designed to boost productivity within the Zoom platform. It provides features like drafting emails and chat messages, summarizing meetings and chat threads, and offering real-time assistance during meetings. AI Companion is included at no additional cost with paid Zoom user accounts, making it a valuable tool for those heavily reliant on Zoom.
Pros of Zoom AI Companion:
- Seamless integration within the Zoom ecosystem.
- Automated meeting summaries and action points save time.
- Enhanced collaboration tools, such as real-time assistance and insights.
- Included with paid Zoom accounts at no extra cost.
Cons of Zoom AI Companion:
- Limited to Zoom: If your organization or collaborators primarily use Microsoft Teams, Google Meet, or other platforms, Zoom AI Companion won’t integrate with their workflows, potentially creating silos.
- Platform Exclusivity: You may need to manually transfer AI-generated outputs (like meeting summaries) to external tools or platforms, which can disrupt efficiency.
- Learning Curve: Teams unfamiliar with AI tools or less tech-savvy participants may not immediately see the benefit, requiring additional onboarding or training.
- Privacy Concerns: As with any AI feature, some users may feel uneasy about having sensitive discussions analyzed by AI, particularly with Zoom having some issues in the past with security.
For more information about Zoom AI companion, check out our deep dive on how it works.
What Are The Best Alternatives to Zoom AI Companion?
If you want to avoid using Zoom AI Companion completely but still get the same features and functionality as the add-on, there are alternatives such as tl;dv and, other third-party apps such as Otter and others.
For more information look at our Zoom AI Companion Alternatives.
Do Zoom Recordings Expire?
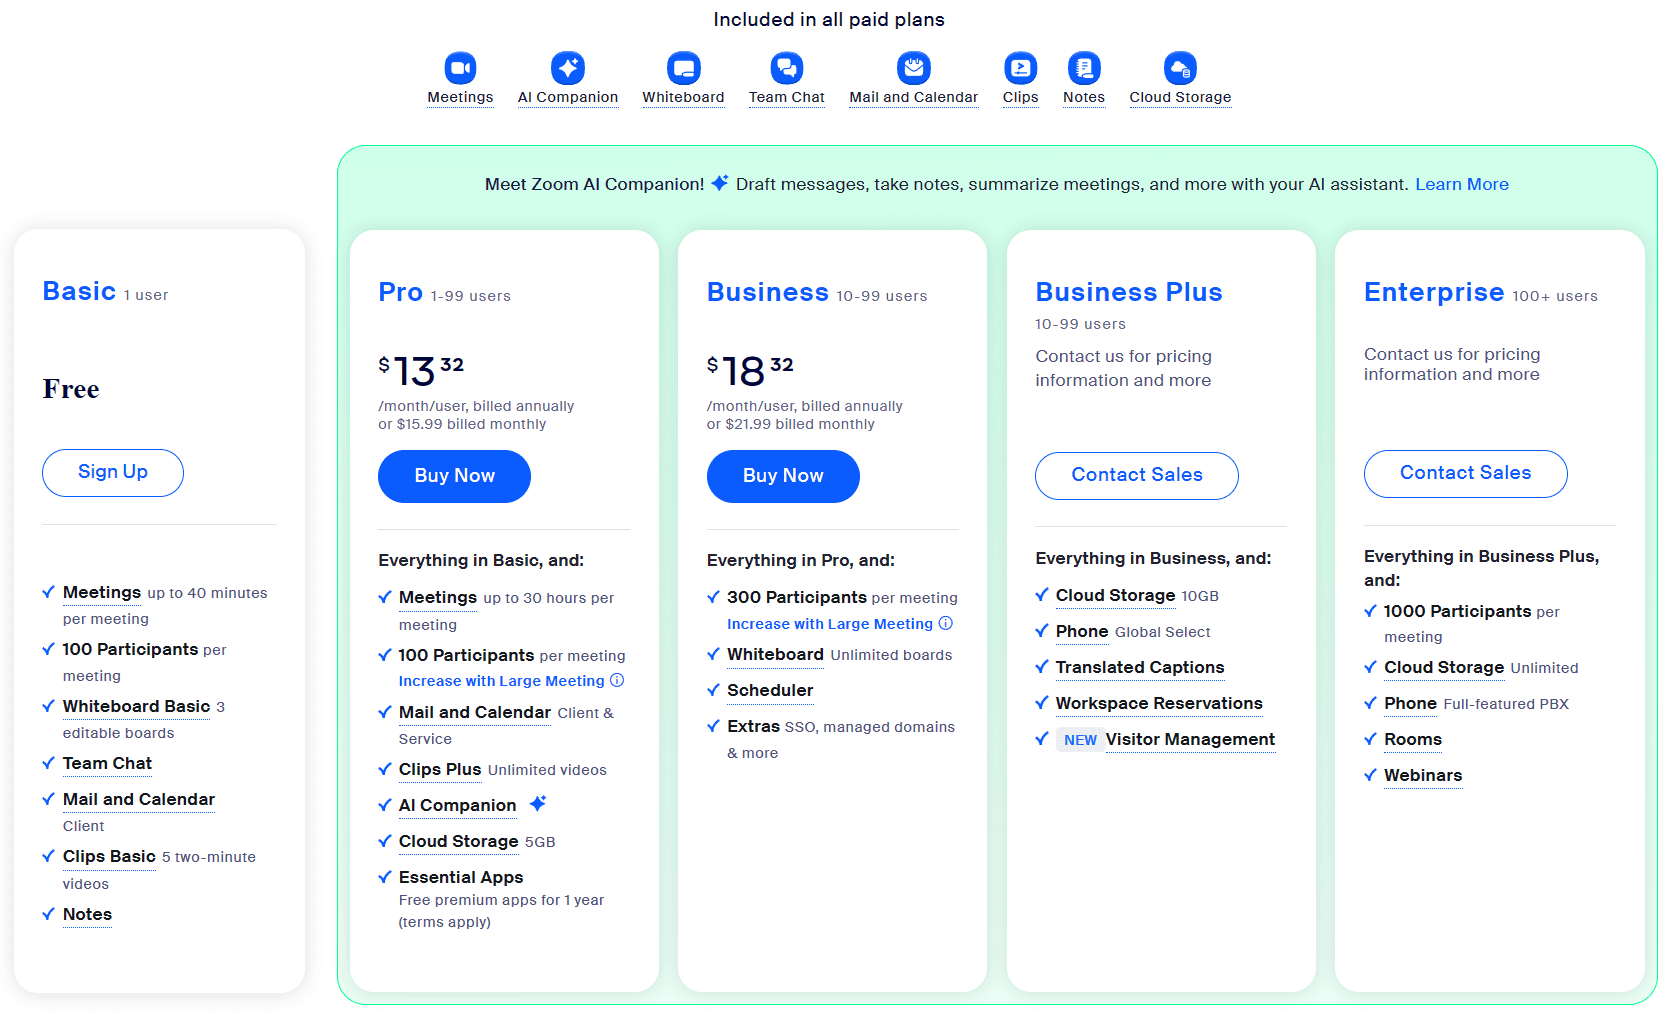
Yes, Zoom recordings can expire, but it depends on your account type and where the recordings are stored. For free users, cloud recordings are only available for 30 days before they’re automatically deleted. If you’re on a paid plan, cloud recordings typically remain available until you manually delete them or exceed your storage limit.
To ensure your recordings don’t disappear unexpectedly, you can download them to your local device or transfer them to an external storage service like Google Drive or Dropbox. Local recordings, by contrast, do not expire as long as you keep them on your device.
How to Edit Your Zoom Recordings?
Editing your Zoom recordings lets you streamline meeting footage, highlight key moments, and remove irrelevant sections. While Zoom’s built-in tools offer basic editing features, using advanced tools like tl;dv or other third-party software can take your recordings to the next level.
Using Zoom
For cloud recordings, Zoom provides a simple trimming feature. Log in to your account, navigate to the recording, and select Edit to adjust the start and end points. This is useful for cutting out unnecessary chatter at the beginning or end of a session.
Using tl;dv
If you’re using tl;dv, you can easily edit Zoom recordings and annotate your recordings directly. This tool allows you to add timestamps, label key discussion points, and generate sharable highlights for your team. It’s ideal for creating concise, actionable meeting summaries without needing separate software.
Third-Party Tools
For advanced editing, platforms like iMovie, Adobe Premiere Pro, or Clipchamp let you add transitions, text, or even overlays to your recordings. Download your Zoom file, import it into one of these tools, and refine it to suit your needs.
How to Securely Save Your Zoom Meeting Recordings?
Saving your Zoom meeting recordings securely is essential to protect sensitive information and ensure easy access when needed. Whether you choose local storage or cloud options, here’s how to keep your recordings safe.
Local Storage
When saving recordings locally, they’re stored on your computer. To secure them:
- Use a dedicated folder with restricted access.
- Enable encryption on your device to safeguard files.
- Regularly back up recordings to an external drive or a secure cloud service for redundancy.
Cloud Storage
Zoom’s cloud recording feature offers convenience, especially for licensed accounts. To secure your cloud recordings:
- Set up a strong passcode for accessing shared recordings.
- Use Zoom’s recording authentication feature to restrict access to specific users.
- Regularly review your recordings and delete outdated files to minimize risks.
For more information on saving your Zoom meeting recordings, check out our guide on securely saving your recordings.
My Zoom Recording Is Not Showing Up. Where Did It Go?
It’s frustrating to finish an important Zoom meeting only to discover your recording seems to have vanished. Don’t panic—missing recordings are often due to common, fixable issues. Let’s troubleshoot the most likely scenarios and explore an alternative solution with tl;dv.
Processing Delays
For cloud recordings, Zoom needs time to process the file before it’s available. Depending on the meeting length and server traffic, this can take anywhere from a few minutes to several hours. To check:
- Log in to your Zoom account and navigate to the Recordings tab.
- Look for your meeting under the Processing status.
- If it’s still processing after 24 hours, contact Zoom Support for assistance.
Local Recording Issues
If you saved your recording locally, it’s possible the file was misplaced. Zoom stores local recordings by default in the Documents/Zoom folder. To locate the file:
- Open the Zoom desktop client.
- Go to Meetings > Recorded and click Open to find the file.
- Use your computer’s search bar to look for .mp4 files if you still can’t locate it.
Storage Limitations
Cloud recordings may not appear if your account has reached its storage limit. In this case:
- Log in to Zoom and check your Usage Summary under the Recordings tab.
- Free up space by downloading and deleting old recordings.
Recording Didn’t Start
If no recording notification appeared during the meeting, the recording likely wasn’t started properly. Always double-check that the Record button is active in the Zoom toolbar.
Technical Glitches
Update your Zoom app to the latest version to avoid bugs, and ensure that recording settings are enabled in your account.
Fix It with tl;dv
If Zoom recordings frequently disappear or fail, consider using tl;dv, a powerful alternative for capturing meetings. This tool automatically records and transcribes your Zoom calls, ensuring key moments are saved without relying solely on Zoom’s features. With tl;dv, you can easily access, share, and even annotate recordings—all while staying organized and productive.
Other Frequently Asked Questions About Zoom
Can you record Zoom meetings for free?
Yes, Zoom allows free users to record meetings locally on their devices. However, cloud recording is only available to licensed accounts (Pro, Business, or Enterprise).
If you’re on a free plan and need cloud recording capabilities, consider upgrading your account or exploring alternatives like tl;dv, which integrates seamlessly with Zoom and offers additional features like transcription and timestamps.
How much storage does a Zoom recording take?
The size of a Zoom recording depends on its duration and recording quality. A one-hour meeting typically takes up:
- Standard Definition (SD): ~150–200 MB
- High Definition (HD): ~300–500 MB
For cloud recordings, your Zoom account will have specific storage limits depending on your plan. Local recordings will depend on the available space on your computer or external storage.
Can you password-protect Zoom recordings?
Yes, Zoom allows you to password-protect your cloud recordings to ensure they’re accessible only to authorized viewers.
When sharing a recording link, you can enable a password in the Share settings.
For added security, you can also restrict access to specific users by enabling authentication.
Local recordings, however, require you to use your device’s security features, like encryption or password-protected folders.
How do you convert a Zoom recording to MP4?
Zoom automatically saves local recordings as MP4 files, so there’s no need for manual conversion. If you can’t find your MP4 file, check your Zoom client:
Go to Meetings > Recorded.
Select the relevant meeting and click Convert if prompted.
If you’re working with cloud recordings, download the file, and it will save as an MP4 by default.
What are the best tools for recording and managing Zoom meetings?
While Zoom’s built-in tools are sufficient for basic recording, alternatives like tl;dv can enhance your experience. tl;dv automatically records, transcribes, and highlights key moments in your meetings, making it easier to share and revisit important discussions. Plus, it works seamlessly with both free and licensed Zoom accounts.
What should I do if my Zoom recording won’t play?
If your recording doesn’t play, it might be due to a corrupted file or an incompatible media player. Try the following:
- Use a reliable media player like VLC.
- Reconvert the file using Zoom (for local recordings).
- If it’s a cloud recording, re-download the file and try again.
How can I maximize the value of my Zoom recordings?
To make the most of your recordings, consider tools like tl;dv that offer searchable transcripts and timestamped highlights. These features make it easier to revisit key moments, share actionable insights with your team, and save time by avoiding the need to watch entire meetings again. Additionally, tools like these integrate seamlessly with Zoom, ensuring your recordings are both accessible and organized for future reference.
Problem With Zoom? Check Out This Troubleshooting Guide
Common Zoom Recording Problems and How to Fix Them
Even with Zoom’s user-friendly interface, recording issues can occasionally arise. From storage limits to corrupted files, here’s a detailed guide to troubleshooting the most common problems and ensuring your recordings stay intact.
1. Troubleshooting Storage Limit Issues
Storage limitations are a frequent challenge, especially for users with free or basic accounts. Here’s how to manage space effectively:
Cloud Storage: Managing Limits
- Free Up Space: Regularly review your cloud recordings and delete older or unnecessary files. Zoom allows you to download recordings to your local device or transfer them to external storage like Google Drive, Dropbox, or OneDrive for safekeeping.
- Upgrade Your Plan: If storage limits are a recurring issue, consider upgrading to a plan with more storage capacity. Licensed accounts, such as Pro or Business, typically include generous cloud storage options.
- Compress Files: Use video compression tools to reduce the size of recordings before uploading them back to the cloud. This allows you to save space while keeping essential files accessible.
Local Storage: Clearing Space on Your Device
- Check Disk Space: Ensure your device has adequate free space before starting a recording. Tools like Windows Disk Cleanup or macOS Storage Manager can help identify and remove unnecessary files.
- External Drives: Invest in an external hard drive or SSD to store recordings without cluttering your primary device. This is especially useful for large or long-duration meetings.
- Organize Recordings: Create a folder structure for your local recordings to avoid duplicates and make it easier to locate files when needed.
2. Fixing Poor Audio or Video Quality
Quality issues can impact the usability of your recordings. Here’s how to avoid common pitfalls:
Audio Issues
Test Beforehand: Use Zoom’s audio settings to test your microphone and ensure it’s functioning properly.
External Microphones: Upgrade to a high-quality external microphone for clearer sound, especially for professional meetings or webinars.
Noise Suppression: Activate Zoom’s built-in noise suppression to filter out background sounds like typing, fans, or external chatter.
Video Issues
Lighting: Ensure your room is well-lit and your camera is at eye level to produce clear, professional-looking recordings.
Stabilize Internet Connection: Unstable internet is a common culprit for poor video quality. Use a wired connection whenever possible, and avoid streaming or downloading large files during meetings.
Adjust Video Settings: In Zoom’s settings, enable “HD Video” for higher resolution recordings, but balance this with your internet speed to prevent lag.
3. Recovering Corrupted Recordings
Corrupted files can be frustrating, but they’re not always a lost cause. Follow these steps based on the type of recording:
Local Recordings
- Repair Tools: Use free tools like VLC Media Player to repair minor video file corruption. For more severe issues, specialized software like Stellar Repair for Video can rebuild damaged files.
- Reconvert the File: Sometimes, simply converting the recording to another format (e.g., .mp4 to .mov) using video editing software can resolve playback issues.
Cloud Recordings - Check Your Internet Connection: Corruption during upload is often due to unstable internet. Re-upload the file from the local backup if possible.
- Contact Zoom Support: If the recording is missing or inaccessible, Zoom Support can often retrieve the file or identify what went wrong. Be sure to provide meeting details and timestamps for faster resolution.
4. Resolving Missing Recordings
Host-Side Issues
- Double-Check Permissions: Ensure the recording setting was enabled in your meeting setup. If the option was toggled off before starting, no recording will be available.
- Check Shared Accounts: If using a shared Zoom account, verify whether another user has accessed or removed the recording.
Participant-Side Issues
- Verify Notification Settings: Ensure participants were notified when the recording started. Some may decline to share their video/audio, which could result in missing content.
5. Preventing Distorted Recordings
Audio Distortion
- Bandwidth Management: If audio breaks up during recordings, prioritize Zoom traffic on your router or network. Many routers allow you to allocate more bandwidth to specific applications.
- Audio Drivers: Keep your audio drivers updated to ensure compatibility with Zoom.
Video Distortion
- Avoid Rapid Scene Changes: Quick movements or screen switching during meetings can strain video rendering and create pixelation. Keep transitions smooth and deliberate.
6. Addressing Compatibility Issues
Playback Errors
- Unsupported Players: Some default media players (like QuickTime) may not support Zoom’s recording formats. Use VLC Media Player or KMPlayer for consistent playback.
- Codec Issues: If your recording won’t play, it may require a missing codec. Install comprehensive codec packs like K-Lite Codec Pack for smoother playback.
Sharing Errors
- Link Not Accessible: Ensure your shared cloud recording link has the appropriate permissions enabled (e.g., password protection or user authentication).
- Email Attachments: For local recordings, compress files before emailing them to ensure they meet size limits.
7. Anticipating and Avoiding Common Pitfalls
Ensure Meeting Settings Are Ready Beforehand
- Pre-Meeting Checklist: Test your recording settings during a dry run to ensure all permissions and configurations are correct.
Set Up Recording Redundancy
Use a Secondary Recorder: For high-stakes meetings, use a secondary tool like tl;dv to record simultaneously. This provides a safety net in case Zoom recording fails.
A Quick Round-Up of Zoom Key Takeaways
If you are keen to record with Zoom, share with Zoom, or even just interact with Zoom, here are the topline tldr takeaways for using the platform.
Recording as a Host
As a host, you have full control over enabling and managing recordings. Start by activating the feature in your account settings, then select between local and cloud storage during meetings. This flexibility allows you to save recordings directly to your device or store them securely in the cloud for easy access and sharing.
Recording as a Participant
Participants can record meetings only with host permission. If granted, simply click the Record button to capture the session. Alternatively, tools like tl;dv enable participants to record, transcribe, and highlight meetings without needing explicit host approval, ensuring you never miss a moment.
Using the Mobile App
Recording on the Zoom app is straightforward but limited to cloud storage for licensed accounts. Tap the More menu to start or stop recordings, and retrieve them later through your cloud storage dashboard.
Alternatives and Screen Recording
If host permissions are unavailable, tools like tl;dv, OBS Studio, or Loom offer excellent alternatives for capturing your screen during a Zoom meeting. Remember to always prioritize transparency and ethics when using these tools.
Troubleshooting Issues
Common problems, like missing recordings or storage limits, are often easy to resolve. Check your Zoom settings, account status, and device storage for quick fixes. For persistent issues, refer to our detailed troubleshooting guides.
Mastering Zoom Recordings
Whether you’re capturing critical details, creating content, or making collaboration seamless, mastering Zoom’s recording tools empowers you to stay efficient and organized.
For hosts, participants, and mobile users alike, this guide has outlined the step-by-step processes to record meetings effectively. But the tools don’t stop there. tl;dv offers an innovative way to make the most of your recordings by adding real-time transcriptions, timestamps, and shareable highlights, all while ensuring privacy and transparency. It’s a practical upgrade for anyone serious about making their meetings more productive.
Ready to take your Zoom skills to the next level? Save this guide for quick reference and share it with teammates or friends who might need it.